Press the icon on the Right Cockpit Panel to
access navigation. The screen will display your current location
and street name (where applicable).
If you pan away from the current location, the street name will be replaced by a Recenter button. Touching Recenter is a quick way to return to the default view showing the current position.
Note: The user profile that first uses
the navigation system will receive a prompt and that user must read and agree to the
Terms and Conditions before proceeding.
The smart drawer can expand the Navigation screen into the Pilot Panel for additional menus not available in the Right Cockpit Panel.
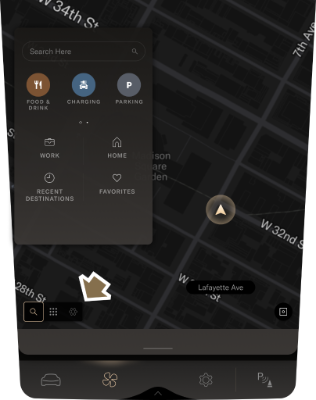
Search
Open the smart drawer on the Right Cockpit Panel to select a destination. Use voice
commands to navigate hands-free. Tap the search icon to choose from one of the search
category shortcuts or recent destinations and search terms.
Save Home and Work locations using icon after searching for a
location.
Move the smart drawer into the Glass Cockpit to access additional options:
Use the Search bar to type an address or a business name via the on-screen keyboard.
You can also select one of the six categories. Swipe left or right to view additional categories.
You will see RECENTS by
default when opening Search. Before typing anything in the search bar, you can select from
the list of recently-used destinations or search terms. Those places will be replaced with
search matches if you start typing something.
In the Search function, you may pan the map to
another location and tap Search This Area to refresh the search results with matches for
the new area.
When routing, you have two additional ways to search:
Along the Route
Near Destination
Navigation Settings
Press the icon on the Navigation screen via the Pilot Panel to configure navigation options, including:
Satellite Imagery: This toggles preferences for showing Satellite Imagery as the background map. When connectivity is poor, the Satellite images might initially look blurry while they fully load.
Traffic:This toggles preferences for showing traffic on map, such as flow and incidents. This feature requires connectivity to work. When connectivity is poor, the Traffic information on the map may be slow to load. Traffic is visible at several zoom levels, while zoomed in at city level and street level views.
Offline Mode: Navigation App settings now have an offline mode if users are concerned
about privacy. You will not be connected to a server, but GPS is still
available. Before switching to Offline mode, you must first download maps
while you are still connected via WiFi or cellular connectivity. While in
Offline Mode you can do Offline Search (limited to in-map businesses),
Offline Routing (not considering Traffic or Charging) and can hear Offline
turn-by-turn route guidance.
Note: The number of Points of
Interest for Search is more limited and the route will no longer be an
EV Route (it won't auto-add charge stops, if needed), if connectivity is
lost and you are only using downloaded maps.
Offline Maps: Users can now download one
or more states or provinces at a time. Offline maps are used when connectivity
is lost, or in Offline mode. You can also pause and resume a download to control
what gets downloaded and when.
Personal Data: The navigation system collects personal location data to improve your trip recommendations. You can permanently delete your personal data from this screen.
Note: Only a primary user can accept or reject Terms and Conditions or delete downloaded maps. If the primary user declines Terms and Conditions, navigation will stop working for all users until the Terms and Conditions are accepted.
Anonymous longitude/latitude data is shared with our navigation service partner to enable Search and Routing, but personal data is locally saved. Both primary or secondary users can delete their own data. The navigation will still work in Guest mode after deleting, but home, work, and destination history will be erased.
Note: Deleting personal location data cannot be undone. Lucid does not store a copy of this data.
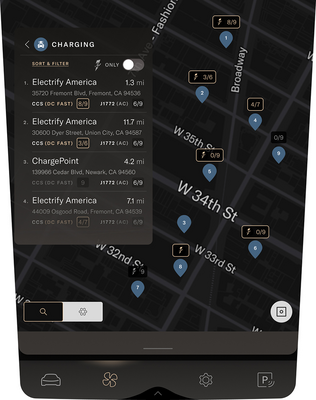
Charging Category Search
Tap the CHARGING search category icon for the best way to
search, sort and filter Charging Stations locations.These will include plug type and
availability information by Stand (not by Plug) wherever possible. The plug type and
availability information requires connectivity.
The default view shows nearby Lucid Charging Partner's DC fast chargers above 150
kilowatts, which provide the best charger user experience.You can adjust your Filter
options to see more.
There is a toggle to see nearby trusted charging brands and locations and
Lucid Charging Partners.
Note: Only public chargers will be shown.
Note: Your connection will attempt to
supply power up to the published power output. The actual power delivery may be
lower, depending on external factors.
You can also manually sort and filter chargers based on criteria, such as
availability, distance, power, plug type, or charging vendor (such as Electrify
America, Electrify Canada, or Lucid Partner of Top Brands in Europe).
Note: DC FAST Chargers are not yet
available in some countries. The EV Routing feature will, therefore, not be able to
auto-add DC Charging Stops. Because of this, Lucid recommends manually
searching for nearby chargers and adding them as stops on your route. However, the
new route ETA will not be able to calculate an ETA for manually added stops that
include any potential charging time. Allow extra travel time if you manually add a
charging stop.
Routing
All Lucid routes are EV Routes by default, when connected. Lucid EV routes are
integrated with your vehicle range and consumption profile. Lucid EV Routes
also consider the current state of charge, road profile, temperature,
heating, ventilation, air conditioning (HVAC), and traffic conditions, when
predicting your unique vehicle consumption over time under those
conditions.
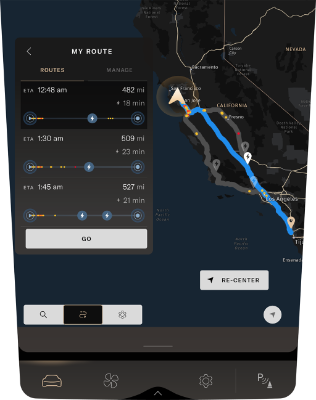
The map will display an overview of the proposed route on both the Right
Cockpit Panel and Pilot Panel once a location is specified. Up to three
route options will be shown, each with its own written summary and visual
display. The recommended top option is the fastest route, with the least
over-all travel time (driving + charging time combined), and is shown on the
map in blue. Other alternative suggestions are shown in gray. Traffic
conditions on each route will also be included. Charge stops will be
auto-added to and displayed on all three routes, if required.
You can preview and plan your route on the MY ROUTE
screen before tapping GO.
For EV Routes which require charging stops, the Nav system has auto-added
Charging Waypoints. The auto-added Waypoints will display the Brand name of
the Charger (if available) in addition to the current charging location’s
name and address.
Note: The system
predicts the estimated remaining energy when you later arrive at a
Waypoint or Destination. The predicted energy estimation is regularly
updated in real-time as you drive toward your Waypoint or
Destination.
After you start driving, alternate navigation routes will be continuously
displayed on the map. They are easily identifiable by a different color and
an info bubble displaying the time difference between them. To change
routes, tap on the route or the info bubble. The alternate routes will
automatically update after a decision point is passed based on new options
ahead.
The alternate routes provide different options to choose from, allowing you to
select the most suitable one for your needs.When connected, the alternate
routes will be shown as the EV Routes with auto-added stops, if needed.
However, even if you're not connected, alternate routes still work for
non-EV routes.
Traveled Route portion is displayed on the Map behind the vehicle icon.
The turn-by-turn guidance instructions will show on the top navigation screen
once the route has started. Lane guidance, exit numbers, and other guidance
details will display when appropriate. If the navigation is replaced with
media or phone while routing, navigation instructions will remain in view in
the Center Cockpit Panel.
Extra details will be provided for each stop when the system automatically adds
charging stops, such as the predicted percent of energy on arrival,
suggested plug type to use, number of minutes to charge for, and minimum
percent to charge up to.
This information will show persistently in both the
DETAILS and MANAGE tabs
until your route ends. You can directly tap each Waypoint on the route from
the map view to access more details.
When you arrive at an Auto-Added Charging Waypoint, this information will
remain on the screen until you dismiss it. You can now review the
recommendation and make sure you're comfortable with it before
proceeding.
Note: The Navigation App calculates
to predict energy usage along the route. For more information, see Predicting Energy Usage.
The smart drawer will show a full list of instructions when you start a trip.
This list will automatically minimize after thirty seconds to use the full
screen for viewing your maps and route. The route will display all of your
stops and traffic conditions.
The smart drawer can be manually reopened by tapping the center icon in the
lower left of the Pilot Panel. See the DETAILS tab for the list of remaining
turn-by-turn instructions. See the MANAGE tab for a
list of just the stops. You can add, reorder, or delete stops.
If you deviate from the route at any point, the system will immediately and
automatically recalculate a new route and issue new instructions.
The route will continue to be present on the screen if, while routing, you have
to stop and turn off the vehicle and come back and turn it on.
Press END or use voice commands, such as cancel
navigation, to end navigation.
An Insufficient Charge notification will appear on
navigation if the EV route requires charging, but a fast charger could not
be automatically added along the route. In this case, we recommend that you
manually search for charging. Slow chargers can usually be found and used
along the route.
Note: When routing starts, a mute
button will appear on the top navigation screen, enabling you to turn off
the audio guidance.
Predicting Energy Usage
When connected, the Auto‑Add Charging feature is
always ON and helps anticipate the vehicle’s charging needs
for a trip. This feature automatically adds DC charging stations to
a calculated route, as needed.
Note: You must manually
search and add a charging stop to your route if no DC charging
stations are available. For manually added chargers, the route ETA
calculation will not be able to estimate the required charging
time.
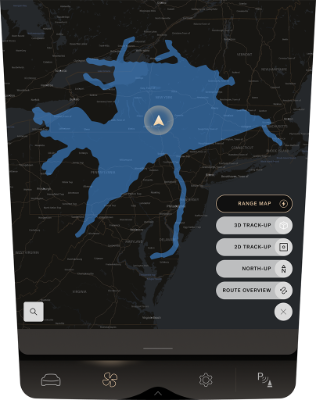
Using Range On Map
The Lucid Range On Map provides a visual representation of anticipated range based on your current battery state of charge, traffic conditions, elevation changes, and more. To display the Range On Map, select the feature using the map controls.
Adjusting the Map
The maps on either the Right Cockpit Panel or the Pilot Panel can be individually
rotated, panned, or zoomed in and out via the touchscreen. The
RECENTER button will appear any time the map is
manipulated beyond your vehicle’s current position. Tap it to return to your current
position.
Pinch to zoom, or use one finger to double tap the touchscreen and zoom in on the
map. Use two fingers to tap the touchscreen to zoom out. Swipe two fingers on the
touchscreen to access a 3D view of the map.
The map centers around your current location by default and the current street name
is displayed.
The Pilot Panel and Glass Cockpit can maintain their own independent map setting and
zoom level whether routing or not. Touch the icon in the lower right of the map to
select from one of five default map viewing modes:
Range Map:
Shows the approximate range that can be traveled using your current level of
charge.
3D
Track-Up: 3D view that tracks your vehicle’s current position,
and rotates the map to show what is in front of the vehicle.
2D
Track-Up: 2D view that tracks your vehicle’s current position,
and rotates the map to show what is in front of the vehicle.
North-Up:
2D view where North is always at the top of the map.
Route
Overview: Displays your current route end to end.
Note: The
Route Overview option will only appear when a
route is selected.
The default map views will be ignored once you start manually interacting with the
map. The system will maintain your personal user mode until you select one of the
default views listed above.
The map contains features such as real time traffic, buildings, realistic 3D
landmarks in most city centers, and points of interest. Points of interest can be
selected from the map to see details and create a route to them. You can also tap a
random place on the map to view their coordinates and make a route to that
point.
It is also possible to turn on and off traffic and satellite maps in the Navigation
app settings.
Setting Home and Work Destinations
Common destinations, such as your home or workplace, can be stored as shortcuts in
the system, allowing you quick access within the Navigation menus.
If the Home and Work icons are already set in the Search drawer, they can be used as
one-touch shortcuts to start a Route. Otherwise, type your address in the Search
bar, select it to see the details tab, and tap the heart icon to save as Home or Work location. Home and work locations can also be
set using voice commands and in vehicle Profile settings.
The applicable icon will appear next to the destination under its details.
The option under its details will change to Remove once a
destination is set in this manner.
Map Updates and Offline Mode
Your in-car Navigation system will first try to get the newest maps around you over a
wireless connection because it is connected-first. The system will fall back on
using stored, offline maps, (on-board), if connectivity is temporarily unavailable.
A small amount of near-by maps will automatically download for offline use, it is
recommended to download your entire state for offline use manually.
Lucid strongly recommends you download your local state or province as a
backup map in case connectivity is ever lost. You can download as many maps as you
would like and can update them as often as you want, via deleting and re-downloading
them. However, downloading maps requires connectivity, and is very fast when you
have strong connectivity.
The local auto-downloaded maps are self-healing and are automatically updated
over-the-air with no user intervention when a data connection is present as they
become available.
When Offline, the Nav system can only display, search, and the route based on local
or downloaded maps. Search results will be labeled as OFFLINE RESULTS, and routes
will not be based on the traffic or EV considerations.