Table of Content

Vehicle Towing and Recovery Methods

Before towing, enable Flatbed Transport Mode under Settings > Vehicle Settings > Maintenance.

Flatbed Transport Mode guides the towing preparation process and automatically turns off Anti-Theft Protection.

Alternatively, Anti-Theft Protection can be manually disabled via the Lucid Mobile App or from the Pilot Panel:
  • On the Pilot Panel, go to Safety and Security > Anti-Theft Protection > Disarm
CAUTION: Do not carry the key fob in your pocket or interact with it during towing. The vehicle may detect nearby key fob movement and automatically re-enable Anti-Theft Protection. If the alarm activates during transport, pull over and disarm the system before continuing.
Note: Directly attaching chains or hooks to vehicle components is not approved by Lucid and may result in vehicle damage. Lucid will not warrant nor be held liable for damage caused by directly attaching hooks, chains, or straps to vehicle components.

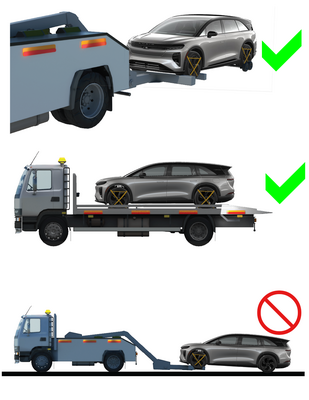
Lucid prefers the use of the Rollback truck (Flatbed) that includes the Self-Loading Recovery Dolly, Tow Eye or Tow Strap.

1. High-Speed Dolly

High-speed dolly systems support the vehicle’s rear wheels, while a tow vehicle supports the front wheels. This is an acceptable recovery option for short distances, under 20 miles.

Always follow recovery equipment’s manufacturer instructions for use.


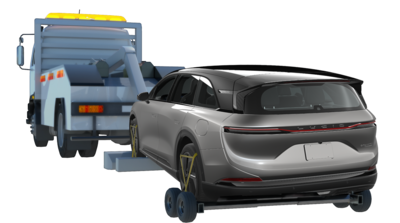
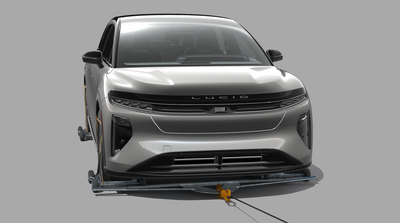
2. Self-Loading Recovery Dolly

Self-loading dolly systems allow winching a vehicle onto a flatbed carrier or rollback tow truck. They incorporate an attachment point for the winch cable directly to the dollies. Use this method when wheels are locked (e.g., due to power loss). Self-loading dollies support all wheels during winching to reduce the risk of vehicle damage.

Always follow the recovery equipment’s manufacturer instructions for use.


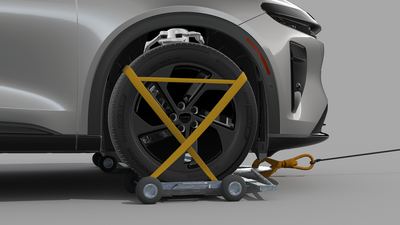
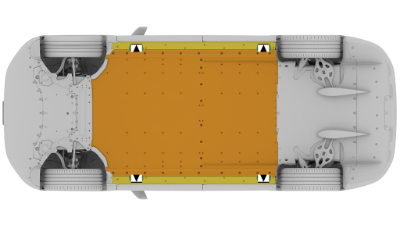
Make sure to secure the vehicle onto the bed as per the dolly’s manufacturer instructions, with the vehicle remaining on the dollies.

See detailed instructions under Securing Vehicle for Transportation.
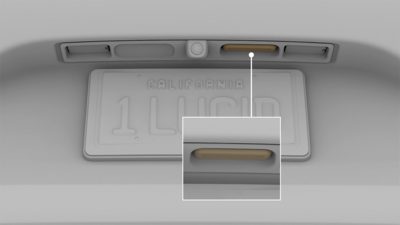
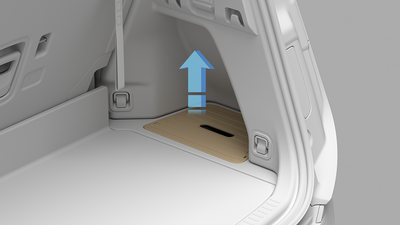
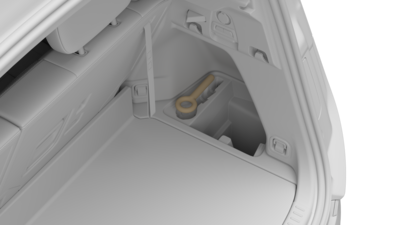
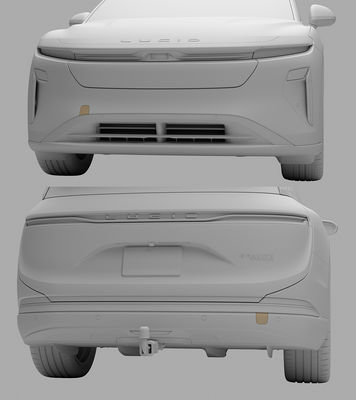
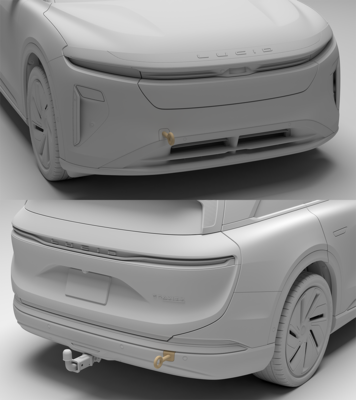
3. Tow Eye

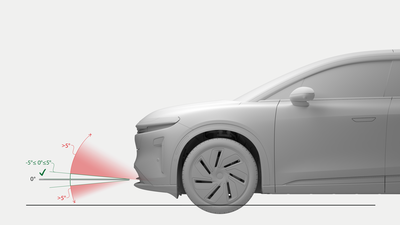
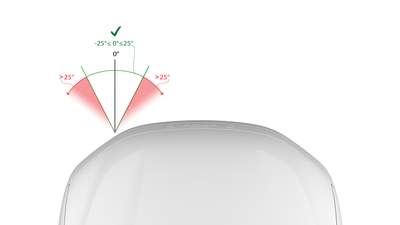
The tow eye can be used at the front and rear of the vehicle, but has load limitations (19.54kN/ 1992kg/ 4392lbs) with vertical and horizontal angular limitations for the operation of the winch cable relative to the location of the tow eye attachment.

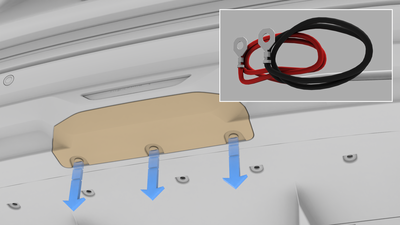
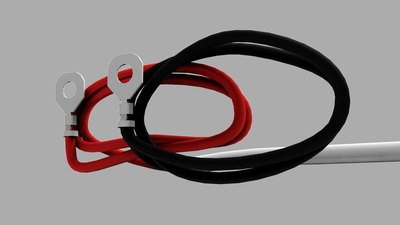
The tow eye used on all models:


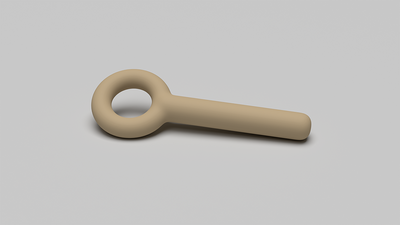
Carefully review the instructions under Towing Device Method before use and consider these limits before using the tow eye.

Transporting the Vehicle

Warning: Towing the vehicle with the wheels on the ground may cause serious damage to the vehicle.


DO NOT TOW THE VEHICLE WITH ANY OF ITS WHEELS DIRECTLY ON THE GROUND. Doing so could cause serious damage to the vehicle's powertrain.

Warning: If the high-voltage battery pack has been damaged, punctured, or compromised, further flexing or structural twisting of the vehicle could lead to thermal runaway, fire, or re-ignition of the high-voltage battery pack. If you know or suspect that the high-voltage battery pack has been severely damaged, do not move the vehicle unless it is necessary for safety reasons to do so, and contact Lucid Customer Care.
Warning: A key cycle will re-energize the high-voltage powertrain. Before performing a key cycle, inspect the vehicle and confirm that there is no high-voltage damage following a crash event.

Preparing Vehicle for Transportation

Warning: The high-voltage battery pack can ignite or re-ignite after an incident if the structure of the battery has been damaged as a result of an accident. Store the vehicle a minimum of 50 ft / 15 m from other vehicles, structures, and flammable materials for a minimum of 24 hours, and monitor vehicle temperatures with a thermal imaging camera.
Warning: The vehicle is equipped with high-voltage components that may be compromised as a result of a collision. It is important to assume these components are energized. Always follow high-voltage safety precautions until emergency response professionals have evaluated the vehicle and can confirm that all high-voltage systems have been disabled. Failure to do so may result in serious injury or death.
Warning: Lack of engine sounds does not mean the vehicle is off. Silent movement or instant restart capabilities exist until the vehicle is fully shut down. Wear appropriate PPE.
Note: The vehicle automatically engages the electronic parking brake when the driver's door opens. Use a combination of jack/dollies or tire skates under rear wheels to prevent vehicle damage if the vehicle electrical systems are not functioning and/or the electronic parking brake cannot be disengaged.

Activate Flatbed Transport Mode Using the Pilot Panel

To activate Flatbed Transport Mode using the pilot panel:

  1. Press and hold the brake pedal.
  2. Ensure the gear is in N (Neutral) or P (Park).
  3. On the pilot panel, navigate to Settings > Vehicle .
  4. Toggle Flatbed Transport to On.
While in Flatbed Transport Mode, the vehicle will operate only in N (Neutral) or P (Park). If the vehicle has already been secured on the flatbed and Flatbed Transport Mode was not activated beforehand, it can also be enabled remotely via the mobile app — as long as the vehicle is in P (Park).
Note: Once Flatbed Transport Mode is enabled, the vehicle will automatically shift to N (Neutral).
Note: Always ensure the flatbed truck is properly positioned before enabling Flatbed Transport Mode, as the vehicle may begin to move.
Note: After activation, the vehicle may roll if left in Neutral. Secure the vehicle properly to prevent unintended movement.
Warning: Do not activate Flatbed Transport Mode until the flatbed truck is fully positioned. Activating the mode too early may allow unintended vehicle movement.
Warning: Keep the brake pedal pressed to prevent vehicle movement while this mode is active. The vehicle may roll if the brake is not applied during set up.

Disabling Flatbed Transport Mode

Ensure the vehicle is in Park (P) or that the brake pedal is pressed and held.

On the pilot panel, navigate to Settings > Vehicle .

Select Flatbed Transport Mode, then follow the on-screen prompts to disable the mode.

Once confirmed, Flatbed Transport Mode will turn off. The vehicle will return to normal operating behavior, including ride height adjustment and Drive Mode availability.
Note: Ensure the vehicle is properly secured before disabling Flatbed Transport Mode, especially if it is parked on a slope or still on the flatbed, as gear transitions may allow for vehicle movement.

Pushing the Vehicle

The Lucid Gravity can be pushed to clear the roadway in situations where there is a minimal risk of fire or high-voltage exposure, (for example, the vehicle does not accelerate after stopping at an intersection), and 12V power is present. Shift the Lucid Gravity into N (Neutral) if a driver is present and push the vehicle. The Lucid Gravity may shift into P (Park) if a driver is not present when it detects the driver leaving the vehicle, even if it has previously been shifted into N (Neutral).

Lucid recommends using only the A and B pillars when pushing by hand with the windows in the down position.

Note: Body damage will likely occur if the pushing recommendation is not followed. Lucid will not warranty nor be held liable for issues that may result from failure to follow these instructions.
Note: Lucid Gravity must detect a key in the vehicle and low-voltage power is required to shift the vehicle into N (Neutral).
Note: The touchscreen is unresponsive if the Lucid Gravity has no low-voltage power. Chock the wheels. Then, use an external, low-voltage power source to supply power and shift into N (Neutral). The external power source must be disconnected before moving the vehicle once in N (Neutral). The vehicle will be free rolling when using this method, until the external power is reconnected and the vehicle is shifted into the P (Park) position.

See detailed instructions under Connecting External 12V Power.


  1. A Pillar
  2. B Pillar

Immobilize the Vehicle

  1. Immobilize the vehicle before starting any recovery operation by installing wheel chocks to prevent roll-away.


  2. Apply the Electronic Parking Brake (EPB) by pressing the button on the end of the right-hand mode selector stalk.


  3. Ensure that the vehicle is immobilized, (using the previous steps), if lifting is required.
  4. Use the provided jack points indicated in the image when lifting the vehicle. Do not lift the vehicle under the battery pack location.
  5. Use the provided jack points indicated in the image when lifting the vehicle. Do not lift the vehicle under the battery pack location, illustrated by the orange shaded area in the adjacent image.


Approved Lifting Points
High-Voltage Battery Pack

Towing Device Method

Warning: Use the towing device only for loading and unloading the vehicle to/from tow trucks or transports. Under no circumstances should the vehicle be towed by another vehicle along the road using the vehicle towing device. Doing so can lead to sudden towing device detachment, which may lead to vehicle damage, injury, or death.
Warning: The towing device should not be used in situations where the winch cable load will exceed 19.54kN/ 1992kg/ 4392lbs. Exceeding these limits may cause failure of the towing device, which may lead to damage, serious injury, or death.

The vehicle includes a towing device in the liftgate under the right-hand side access panel.

All models use a tow eye:


Opening the Liftgate

Note: It is necessary to connect an external 12V power source to access the tow eye before proceeding if the vehicle’s low-voltage power is disabled. See the instructions under Connecting External 12V Power .

Option 1

From the large center touchscreen, touch the ‘Openings’ icon at the top. Then touch the Liftgate Open icon on the lower right of the touchscreen.


Option 2

  1. Push the liftgate release button located above the rear license plate area.


  2. Open the liftgate and remove the towing device from under the right-side liftgate floor panel.


    All models use a tow eye, as shown:


  3. Remove the power source if an external power source was used to access the liftgate, and secure the wiring before moving the vehicle to avoid damage.

Installing the Towing Device

Note: These instructions apply to both the front and rear tow eyes.

Remove the Tow Eye Cover

  1. Release the tow eye cover by pressing firmly on the top center until it pivots inward.
  2. Gently pull the raised section toward you. The Tow Eye Cover will remain in place.
  3. Remove the tow eye cover completely before proceeding to the next steps.
Warning: Improper towing device installation could result in the towing device detaching suddenly during vehicle winching. This may cause significant vehicle damage and could result in injury or death to anyone nearby.

Install the Tow Eye

  1. Locate the attachment point on the front or rear of the vehicle.
  2. Insert the tow eye through the bumper and rotate it clockwise into the attachment point on the body until it is fully seated. Ensure the tow eye is parallel to the ground.
  3. Attach the winch cable to the tow eye. The pull angles must not exceed 5 degrees from center either up or down and 25 degrees from center either left or right.
    Warning: Do not use the vehicle towing device if the pull angle is greater than 5 degrees vertically from shaft-center either up or down. Exceeding these limits may cause tow eye detachment that could result in injury or death.
    Warning: Do not use the vehicle towing device if the pull angle is greater than 25 degrees horizontally from shaft-center to either side. Exceeding these limits may cause towing device detachment that could result in injury or death.
  4. Place the vehicle in N (Neutral) by pressing and holding halfway down on the mode selector stalk while holding the brake pedal. The vehicle must always be placed in Neutral with all brakes disengaged. Wheels must be able to move freely. Do not winch the vehicle while the parking brake or the brake pedal is applied. Never drag the vehicle along the ground, as this may exceed the maximum towing line force. Use a combination of jack dollies or tire skate if the wheels cannot roll freely.
  5. Winch the vehicle slowly onto the trailer or transporter. Avoid shock loading. Ensure the winch cable line load does not exceed 19.54kN/ 1992kg/ 4392lbs.
    Warning: Do not allow anyone to stand or walk behind the vehicle during winching operations. In the event of winch/cable or towing device failure, vehicle may roll backwards unexpectedly. This could cause serious injury or death.
  6. Once the vehicle is loaded, immobilize it by placing the vehicle in Park (P).
  7. After using the tow eye, store it back in the liftgate and reinstall the rubber cover on the attachment point. Proceed with securing the vehicle for transport.

Securing Vehicle for Transportation

Warning: Attaching straps to the chassis, suspension, or other parts of the body may damage the vehicle.

Use chocks and tie-down straps to secure the wheels when the vehicle is in position on the transporter or trailer.

To avoid damage:
  • Ensure that the metal parts on the tie-down straps do not come in contact with the vehicle’s painted surfaces or the face of any wheels.
  • Do not place straps over or through the vehicle’s body panels.


Connecting External 12V Power

Warning: Do not connect a battery charger to the jumper wires. This will exceed the maximum allowable electrical ratings of 12-14.4 Volts 50 Amps. Damage to the Engine Control Unit will result. Do not use 12-volt jumper leads for charging the 12-volt batteries. They are only intended for opening a car when the low-voltage system is depleted.
Warning: While external power source is connected, ensure positive (+ red) and negative (- black) leads do not come in contact with each other. This could cause sparks or damage the external power source. Refer to the external power source manufacturer’s instructions for use.
Note: Use a 12-volt jumper pack or equivalent. Do not use Boost or Starting modes as these may exceed the electrical specifications of the vehicle jumper connection (12-14.4 Volts 50 Amps Max).
Note: Lucid will not warranty nor be held liable for issues that may result from failure to follow these instructions.
  1. Locate the jumpstart panel under the vehicle, near the towing connector at the back. Use a Flathead screwdriver or similar tool to remove any clips or fasteners securing the panel, then pull down the panel to expose the connectors.


  2. Carefully remove the panel covering the jumpstart connectors. Connect the red (positive) lead to the external power source first, then connect the black (negative) lead.


  3. Remove external power source and re-secure wires before moving the vehicle. Failure to disconnect an external 12V system prior to continuing tow activities can lead to serious vehicle damage.

Additional Information:

Towing providers with questions should call 888-99-LUCID (888-995-8243).