Table of Content

Safety Checklist

Warning: If you have any concerns with the condition of a wall outlet, the charge port, or the charging cable, DO NOT use them. Seek assistance from a qualified electrician or a Lucid Service Center. Using charging equipment that is damaged or faulty may result in injury, death, or property damage.

Check the following items before charging your vehicle:

  • Inspect the outlet if you are using a domestic wall outlet and do not use it if it appears damaged or worn.
  • Inspect the charging cable and connector for damage, including frays or cracks. Do not use it if a part appears damaged.
    Note: Contact a Lucid Service Center if the Lucid Mobile Charging Cable is damaged.
  • Ensure that the charging cable is fully uncoiled before use.
  • Confirm that the charging connector and charge port are clean and unobstructed. Do not use them and contact a Lucid Service Center if you find any contamination or a foreign object in either part.
  • Check to see that the charging cable and charge port are dry. Ensure your hands are dry, and that there is no water or other fluids in the surrounding area (such as puddles on the ground).

Charge Port Door

The charge port door is located to the rear of the left front wheel.


Opening and Closing the Door

Car doors must be unlocked for the charge port to open. You can open and close the charge port door using any of the following methods:

  • Press the  charge port icon on the Left Cockpit Panel.
  • Select >  OPENINGS on the Pilot Panel and press the  charge port icon.
  • Select >  CHARGING on the Pilot Panel and press the OPEN CHARGE PORT button.
  • Use the Lucid Mobile App.
  • Press the bottom of the charge port door with a valid key fob detected within 6.5 feet (2 m) of the unlocked vehicle, and it will automatically open. The charge port door automatically closes after unplugging the charging cable; otherwise, you can gently push upward on the bottom of the door until automatic closing takes over.


CAUTION: If the charge port door has iced over in cold weather conditions, DO NOT attempt to break the ice using blunt force, (hitting or chipping at it with a tool), as this could cause damage.
Note: Lucid recommends using the in-vehicle controls or the Lucid mobile app if the charge port door has iced over to cycle the open/close function of the door, until the ice breaks.

Manually Opening the Door

CAUTION: Manually opening the charge port door is only recommended in instances where the vehicle has no power and the 12V batteries cannot be charged.

The charge port door can be manually opened if the vehicle has no power:

  1. Open the driver’s door.
  2. Place your finger at the bottom right corner of the charge port door and gently lift it up.
  3. Continue lifting on the corner until a gap begins to form between the top edge and the fender.
  4. Insert your fingers into the gap once it is there along the top edge and gently pull downward until a hard stop is reached.

Charging the Vehicle

The Lucid Mobile Charging Cable is a convenient way to charge your Lucid vehicle at home or on the go. When not in use, it can be stored in the vehicle. See the Lucid Mobile Charging Guide and our website for instructions and additional details about this charger or charging alternatives.

Using the Lucid Mobile Charging Cable, plug the J1772 (CCS type 1) connector into the car's charge port to begin charging.


CAUTION: Lucid recommends to not use adaptors between the charge cable connector and the vehicle charge port. Some chargers can produce electrical current higher than the rated limits of many adaptors. Using an adaptor that is not rated for the current produced may cause excessive heat and damage the charge port. For further assistance, see Contacting Lucid Motors.
Note: The battery system’s heating and cooling functions monitor the temperature of the battery pack during charging, and will turn on or off as needed to help maintain an ideal temperature. Clicking or fan noises are normal.

Errors During Charging

The charge port light will turn red if an error occurs. Details and instructions will display on both the Pilot Panel and Glass Cockpit if this happens.

Contact Lucid Customer Care for further assistance if following the displayed steps does not resolve the error.

RangeXchange™

Note: RangeXchange may not be available in all regions.

If another Electric Vehicle is low on charge, you can use your Lucid vehicle to charge it through shared charging.

Setup

  1. Connect the RangeXchange cable to the Mobile charger.


  2. Connect the short end of the RangeXchange cable to your vehicle.

    The charge port light will flash blue.


  3. Plug in the long end of the RangeXchange cable to the other vehicle.

    This step is the same as the AC charging behavior of the other vehicle.


  4. Start the charging process via the Pilot Panel of your vehicle.

Start a session from the Pilot Panel

  1. Once the Mobile charger is connected to your vehicle via the RangeXchange adapter, the Pilot Panel will display the RangeXchange discharge screen.
  2. To start discharge from your vehicle, tap Start Sharing.
  3. After the connection is established, you can charge the other vehicle.
  4. Your vehicle will continue to discharge until the set limit has been reached.

Discharging Speed and Power Limits

Your vehicle can support upto 9.6 kW of power discharge.

Note: To reserve some charge for your vehicle, tap the Set Limit and move the slider on the Pilot Panel to adjust the minimum discharge limit.
Note: If your charging does not begin within 5 minutes, the charging session will stop. You will have to re-initiate the session from the Pilot Panel.
Note: To stop a discharge session, tap Stop Sharing on the Pilot Panel.

Disconnecting the Charging Cable

Press the button and then pull the charging cable towards you to disconnect it from the charge port and stop a charging session.

Note: The vehicle cannot be driven when the charging cable is connected to the charge port. A notification will appear on the Glass Cockpit if you attempt to shift out of P (Park).

Emergency Manual Charging Cable Disconnect

CAUTION: Manually releasing the charging cable is only recommended in instances where the charging cable button will not release it from the charge port.

The vehicle has a manual disconnect if pressing the button on the charging cable does not release it:

  1. Open the hood. See Hood Opening and Closing.
  2. Pull up on the manual disconnect lever to release the charging cable.


  3. Ensure that the manual disconnect lever is correctly inserted into its original position before closing the hood.

Charging Status

You can check the progress of the charging process via the light on the charge port, in-vehicle displays, or Lucid Mobile App.

Charge Port Light

The charge port light indicates the current charging status. Refer to the following table to understand the meaning of each light color and pattern:

Color Definition
White (Solid) Ready to Charge
White (Flashing) Charging Pending
Green (Flashing) Charging in Progress
Green (Solid) Charging Completed
Red (Solid) Charging Error

The progress meter of the charge port light will flash green when charging, indicating the current charge level of the battery pack.


  1. One LED 0% - 24%
  2. Two LEDs 25% - 49%
  3. Three LEDs 50% - 74%
  4. Four LEDs 75% - 99%

When charging is completed, the light will remain solid green.

Vehicle Display Status

The Pilot Panel and Glass Cockpit will display the current charging status once charging begins, including the time remaining until completion.

Glass Cockpit charging display


Setting a Charge Limit

CAUTION: Charging beyond the recommended level too often can cause premature battery pack degradation.

The charging system will charge the battery to the recommended level without a set charge limit. The vehicle dynamically adjusts the actual charging rate depending on the state of charge, ambient temperature, battery pack temperature, and position of the charge slider.

You may need to adjust the charge limit higher or lower, according to your driving needs. A higher charge limit will increase trip distance. Vehicles that are parked for extended periods should be plugged in and use a lower charge limit to maintain battery pack health.

Follow these guidelines for setting the charge limit:

  • Set the slider to Daily or 50% - 80% for general use. This setting best preserves the battery pack life.
  • Set the slider beyond Daily and up to Distance for more range. Distance allows a full charge.

You may notice changes in reduced regenerative braking and charging speeds when charging beyond the Daily setting. This functionality gradually returns as the car is driven.

To set the charge limit:

  1. Select >  CHARGING on the Pilot Panel to display charging options.
  2. Tap the SET CHARGE LIMIT button.
  3. Use the slider to set the desired level of charge between 50% - 100%. Set the slider to Daily for general use and Distance for a long-range trip.
  4. Tap the DONE button.

You can set a State of Energy (SOE) limit between 50% and 100%. If the battery level at plug-in is below the set limit, the vehicle will display charging complete. Adjust the limit anytime, even if the SOE is above the new limit. A reminder will appear on the main screen if the set limit is lower than the current SOE.

Preconditioning

Preconditioning optimizes the temperature of the battery so it receives the maximum amount of charging from a fast charging station. Your Lucid Air can precondition your battery before fast charging. Start preconditioning about 20 minutes before you intend to plug in to a fast charging station. To start preconditioning:

  1. Select >  CHARGING on the Pilot Panel to display charging options.
  2. Tap the START PRECONDITIONING button.

Your vehicle will start optimizing the battery temperature en route to the charging station. If you arrive at the charging station before preconditioning is complete, you can still plug in and charging will begin automatically.

Note: Preconditioning is not required for home charging (AC charging) since the energy level is low enough that the temperature of the battery does not affect the charging rate.

Scheduled Charging

Scheduled Charging

Scheduled Charging allows you to pick a time when charging will start, even after the charging cable is connected. This can be late at night or during a particular time of day.

Warning: Lucid recommends always using the built-in Scheduled Charging feature. The Scheduled Charging application on third-party chargers may not work properly on your vehicle. For further assistance, see Contacting Lucid Motors.

Scheduling a Charging Session

Schedule a charging session on the Pilot Panel by tapping > CHARGING. The Scheduled Charging option will appear at the bottom of the display.

To set up scheduled charging, select the location and time for charging to begin.

When plugging in, the vehicle must be within 200m of the selected location for charging to be scheduled.
Note: Charging can be scheduled only on non-digital (J1772) AC chargers.

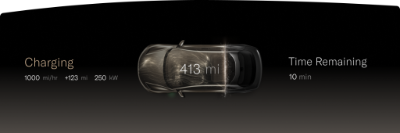
After charging is scheduled, Charging Scheduled will appear on the glass cockpit and the pilot panel, and charging will begin at the selected time.

Note: Unplug and plug the charging cable again to schedule another charging session once charging has begun.

Charging Schedule and Flexibility

Charging will be automatically scheduled to start at the designated time when you connect your vehicle to an AC charger located within a 200m radius of the specified location. If you happen to plug in your vehicle after the scheduled time, charging will commence immediately. This grace period lasts for a maximum of 12 hours following the scheduled time. For example, if you have set the scheduled time for 9:00 PM and you arrive home after having dinner at 10:00 PM, the charging process will start immediately upon plugging in at 10:00 PM. However, if you return from lunch at 2:00 PM and connect your vehicle, the charging will be scheduled to begin at 10:00 PM.

Turning Scheduled Charging On and Off

Tap the toggle to the right of your selected charging time on the Pilot Panel to turn Scheduled Charging on or off.

Note: Your vehicle will start immediately charging when a charging cable is connected and Scheduled Charging is off.

Selecting a New Scheduled Charging Time

Tap the scheduled time on the Pilot Panel to modify it. A Scheduled Charging modal will appear where you can select a new time and location. Tap Confirm.

Overriding a Scheduled Charging Session

Tap Start Charging on the charging screen on either the Pilot Panel or in the Lucid Mobile App if Scheduled Charging is active to override the scheduled time and begin immediately charging.

Note: This will only override the current Scheduled Charging session. The feature will continue to function as normal for all future sessions.

Cold Weather Charging Considerations

CAUTION: Do not expose your vehicle to extreme temperatures for long periods without driving or connecting to a charging cable, as this can negatively affect battery pack life. When temperatures are below 41°F (5°C) and you are not driving your car, connect to a charging cable.

You may experience a range reduction in very cold weather. The Pilot Panel will automatically switch to the  CHARGING screen and display the reduction and remaining range.

blue battery warning indicator will display on the Glass Cockpit when the battery pack is too cold and needs to reserve energy.