Note: Depending on the configuration, your vehicle may not be equipped with a towing package.
Your Lucid Gravity with the towing package comes equipped with a 2" detachable hitch receiver that is capable of towing a trailer and supporting rear-mounted accessories. The towing package also comes with an electrical connector that syncs the vehicle to the brake and light systems of the trailer or other rear accessories.
Note: Certain DreamDrive features will be unavailable when towing a trailer or carrying rear-mounted accessories. For more information, see DreamDrive Limitations.
Warning: Aftermarket trailer hitches should not be installed on the vehicle. Only vehicles with a Lucid-installed tow bar are rated to tow and carry rear-mounted accessories. Installing and operating the vehicle with an aftermarket tow bar may result in unsafe conditions, or cause damage to the vehicle.
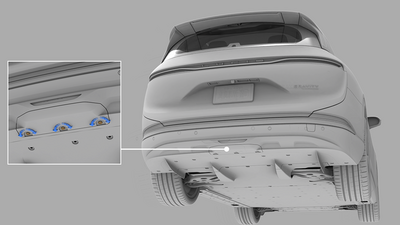
Hitch Cover
Removing the Hitch Cover:
Loosen the three fasteners on the trailer hitch cover by turning them 90 degrees counterclockwise with a flathead screwdriver, then pull down the fasteners.
Note: The fasteners are captive to the cover, do not attempt to remove them from the hitch cover.
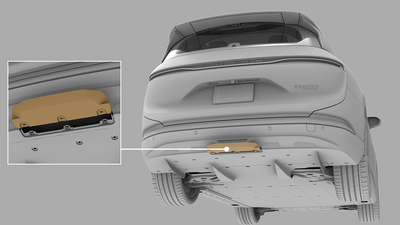
Carefully pull the cover rearwards away from the vehicle to remove it.
Installing the Hitch Cover:
Align the hitch cover tabs to the slots.
Push forward on the hitch cover until it sits flush.
Turn the fasteners 90 degrees clockwise so they lay flush with the hitch cover.
Hitch Receiver
Connecting the Detachable Hitch Receiver:
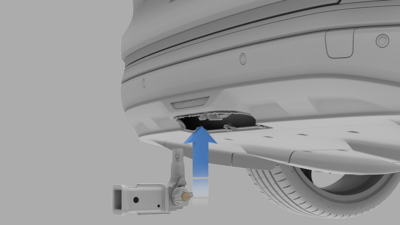
Remove the hitch cover from the hitch housing.
Make sure that the key is in the locking cylinder turned counterclockwise so the locking cylinder can turn into the unlocked position. The locking cylinder will not be able to turn away from the locked position without the key in it.
Hold the hitch from the bottom, then align the triangle guides on the side of the hitch with the same cutouts inside of the hitch housing.
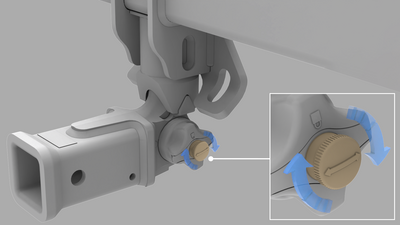
Make sure that the red mark on the locking cylinder aligns with the white dot on the hitch receiver. Plug the hitch receiver into the hitch housing unit until you hear a click sound and the locking cylinder reads that it is in the locked position.
Turn the key clockwise then remove it from the locking cylinder and push down on to the hitch to make sure it does not move or come out.
Note: After hitch installation, enable Hitch Optimization to account for the added length of the hitch to the rear of your vehicle. This will ensure that your vehicle's parking features work correctly. Remove the hitch when not in use. For more information, see Hitch Optimization.
Disconnecting the Detachable Hitch Receiver:
Insert the key then turn it counterclockwise into the unlocked position.
Take hold of the bottom of the hitch, pull on the locking cylinder, and turn it clockwise until the red mark on the cylinder aligns with the white dot on the hitch receiver. Be sure not to drop the hitch receiver. The hitch should detach from the socket and fall out of the hitch housing unit.
Install the hitch cover, then store the detachable hitch receiver in its case.
Rear Attachments Capacity
Ensure that the total load of the rear-mounted accessory does not exceed 119 lbs (54 kg), and that the total load's center of gravity does not extend beyond 24" (63 cm) from the hitch receiver's pinhole.
Warning: Overloading the hitch receiver by exceeding the maximum weight allowed or center of gravity can damage the vehicle and create hazardous conditions while driving.
Rear Attachment Optimization
Activating Rear Attachment Optimization will modify your DreamDrive settings to accommodate rear-mounted accessories. Rear Attachment Optimization will automatically turn on if the system detects that a rear-mounted bike rack or cargo rack is connected.
To manually activate Rear Attachment Optimization on the Pilot Panel, go to:
After removing the rear attachments from the vehicle, remember to turn off the Rear Attachment Optimization in Settings to restore DreamDrive features.
Note: Please note that while the system can detect certain objects are attached and mounted to the vehicle, it is your responsibility to manually engage the Rear Attachment Optimization if the system does not automatically detect it. This ensures the proper functioning and safety of your vehicle.
Note:TOW mode will automatically turn on if a rear attachment with electrical connections is established with the vehicle's electrical connector. Make sure to manually turn off TOW mode and turn on Rear Attachment Optimization before driving the vehicle.
Tow Mode
Activating Tow Mode
Note: Depending on the configuration, your
vehicle may not be equipped with tow package-related features.
Warning: Do not attempt to tow a
trailer without activating TOW mode. If TOW
mode is not activated, towing a trailer could create hazardous conditions and loss of
vehicle control.
CAUTION: Make sure the vehicle
height is set to Standard before attaching a trailer, measuring the tongue weight,
and activating TOW mode.
To manually activate
TOW mode, go to the Pilot Panel >Car
Controls
>TOW.
TOW mode will
automatically activate when an electrical connection between the trailer and vehicle is
established through the electrical connector.
Note: Only the Standard ride height
level is available in TOW mode.
Note: Certain DreamDrive features will be
unavailable while TOW mode is activated. For more information, see
DreamDrive Limitations.
Note: Vehicle speed is limited and will not
surpass 90 mph (144 km/h) when TOW mode is active.
Hitch View and Blind Spot
Display
Hitch View is available as an optional viewing angle in the Rear View Monitor display while
Rear View Monitor is active. For more information, see Rear View Monitoring.
Blind Spot Display will display both vehicle side camera views on the center Clearview
Cockpit while TOW mode is active and the vehicle is in
R (Reverse). For more information, see Blind Spot Display.
Light Check
The light check procedure ensures that trailer lights have been properly connected and will
work in sync with the vehicle.
After establishing an electrical
connection with the vehicle, the light check feature will automate the lights on the
trailer to play repeatedly until you stop the light check feature. Lucid
recommends that you inspect the lights from the outside to ensure they are functional.
You can stop the light check sequence by
pressing Finish Light Check on the Pilot Panel or Mobile App.
Warning: Towing a trailer without functional lighting could create a hazardous
condition and may violate local laws.
Towing a Trailer
Towing Guidelines
Verify that the trailer's coupler is closed and locked to the tow ball.
Connect the trailer's chains to the vehicle's chain loops, crossing them under the
tongue.
Ensure that the trailer's electrical connector is connected to the vehicle.
Make sure that all lights or signals work properly and are in sync with the
vehicle.
Check the trailer brakes are
operational by manually applying the trailer brakes before driving on major roads or
highways.
Always drive cautiously and refrain from
attempting sudden movements or sharp turns while a trailer is attached. Towing a trailer
requires additional care while driving on the road.
Always make sure to increase the
following distance between the vehicle and other vehicles driving ahead. Towing a trailer
increases the vehicle’s stopping distance when braking to a stop or slowing down.
Be aware of all local and national laws
pertaining to towing before towing a trailer of any kind.
Always be vigilant while towing a trailer and avoid situations that may require sudden heavy braking.
Warning: Do not attempt to tow a
trailer without activating TOW mode. If TOW
mode is not activated, towing a trailer could create hazardous conditions and loss of
vehicle control.
Warning: Do not exceed a
speed of 100 mph (160 km/h) while towing a trailer.
Trailer Towing Capacity
Trim
Unbraked Tow Capacity
Braked Tow Capacity
Touring
1,500 lbs/680 kg
3,500 lbs/1,587 kg
Grand Touring
1,500 lbs/680 kg
6,000 lbs/2,721 kg
Warning: Do not tow a trailer that
exceeds the vehicle's rated towing capacity.
Warning: Overloading the trailer
will damage the vehicle and create hazardous driving conditions.
Warning: Do not exceed the Gross Vehicle Weight
Rating (GVWR) or the Gross Axle Weight Ratings (GAWR) of the vehicle, check the GVWR and
GAWR before towing.
Warning: Safe towing requires strict adherence to weight and load distribution
limits. Improper loading can lead to loss of vehicle control, increased stopping distances,
tire and suspension failure, and serious injury or death.
Note: It is recommended to
accurately check axle loads and total vehicle mass with a public weigh scale before travel.
Do not rely on estimated weights or load distribution.
Tongue Weight Capacity
Trim
Maximum Permissible Tongue Load
Touring
600 lbs/272 kg
Grand Touring
600 lbs/272 kg
CAUTION: Tongue weight must not be less than
10% and not more than 15% of the total loaded weight of the trailer.
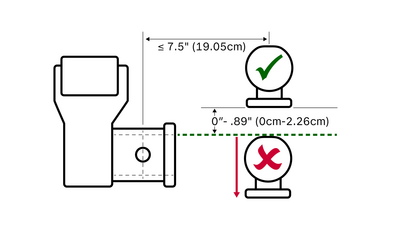
Ball Mount
The hitch receiver supports a ball mount with a rise between 0” (0 cm) and 0.89” (2.2 cm)
from the top inside edge of the hitch receiver to the base of the tow ball. Drop mounts may
not be used. The center of the ball must not be positioned more than 7.5” rearward of the
hitch receiver’s pinhole.
Warning: Do not use a weight distributing hitch. Only weight carrying hitches should be used.
Connecting a Ball Mount:
Insert the ball mount into the hitch
receiver.
Make sure the ball mount hole is aligned
with the hitch receiver hole.
Slide the hitch pin into the aligned
hitch receiver and ball mount hole.
Insert the cotter pin at the end of the
hitch pin.
Disconnecting a Ball Mount:
Remove the cotter pin from the hitch pin,
then slide the hitch pin out from the ball mount and hitch receiver hole.
Slide the ball mount out of the hitch
receiver assembly.
Electrical Connections
Warning: All trailers being towed
must be equipped with functioning brake lights, taillights, side marker lights, and turn
signal lights.
Trailer lights and brakes will be powered by the vehicle through the electrical connector
located in the hitch housing unit. After an electrical connection is established with the
trailer, the vehicle will activate TOW mode.
Note: Lucid recommends only towing trailers with an equipped SAE-J2583 7-pin connector.
CAUTION: Lucid does not recommend using an adapter to tow a trailer equipped with
a different connector from the specified SAE-J2583 7-pin connector. Using a different
connector may result in improper function of the trailer's lights and brakes.
Integrated Trailer Brake
Controller
The vehicle comes with an integrated trailer brake controller that works with trailers
equipped with electric brakes. After connecting the trailer's electrical connector to the
vehicle and setting the trailer brake controller gain, the brake controller will
automatically apply the trailer's brakes in proportion to the vehicle's brakes. The trailer
brakes can also be manually activated by pulling down on the gear shift lever. Trailer brake
gain levels will display and be adjustable on the Pilot Panel when
TOW mode is activated.
Trailer Brake Gain
Note: The brake gain must always be set before
towing a trailer to maintain the stability of the trailer and provide optimal braking
performance.
Setting Trailer Brake Gain:
The brake gain levels range from 0-10 with the lower gain settings providing lighter
braking for lightly loaded trailers while higher gain settings provide stronger braking for
heavily loaded trailers.
Drive at a constant 15 mph (24 km/h) on
dry, flat asphalt and manually apply the trailer brakes using the gear lever. Listen for
the trailer tires locking up.
If the trailer tires do not lock up, stop
the vehicle, then increase the gain and repeat step 1. If the trailer tires do lock up,
stop the vehicle, then reduce the gain and repeat step 1.
The proper gain setting for the trailer
is the highest gain level at which the trailer tires do not lock up on dry, flat
asphalt.
CAUTION: The brake gain setting is
important for stability and braking performance when towing. Always repeat this process any
time a new trailer is connected to the vehicle or the load of the trailer has been
changed.
Note: Before driving off with the trailer,
manually apply the trailer brakes with the gear lever to check if the trailer brakes are
functioning and connected with the vehicle.
Impact on Range
When towing a trailer, the increased weight and additional drag of the trailer will reduce
the drivable range from the original range estimation. Plan your trip distance and charging
stops to adjust to the new range of the vehicle while towing a trailer.
Trailer Sway Mitigation
If the trailer begins to sway excessively, the trailer sway mitigation will automatically
apply the brakes on the vehicle. An alert is displayed on the Clearview Cockpit notifying
you to slow down and check load distribution to mitigate trailer sway.
Warning: Do not disregard the
trailer sway alert. If the trailer sway alert displays, slow down the vehicle, pull over if
it is safe to do so, and adjust the load distribution.