Note: Automatic parking maneuvers are calibrated
according to the tire size. The accuracy of these maneuvers and the overall performance of the
parking experience depends on the vehicle knowing the installed tire size. Installing tires of
different sizes without updating the tire size in the system will affect parking performance.
Lucid strongly recommends changing your tires at a Lucid Service Center to ensure an
optimal automatic parking experience. Failure to do so may cause degraded performance and
potential damage to your vehicle or wheels.
Automatic Park In
Automatic Park In takes control of shifting, accelerating, braking, and steering the vehicle into a parking space.
Note: The sensors only detect parking spaces that are bounded by a three-dimensional object on at least one side (such as an open space next to a vehicle or between two vehicles).
Note: Automatic Park In cannot detect or park in diagonal spaces.
Warning: Automatic Park In does not consider objects located outside the range of sensors during the detection of parking spaces or calculating the parking path. Continually check your surroundings throughout the parking sequence. Be prepared to apply the brake and take control to avoid pedestrians, vehicles, or objects.
Warning: It is the driver’s responsibility to determine whether it is safe and legal to park in a parking space detected by Automatic Park In.
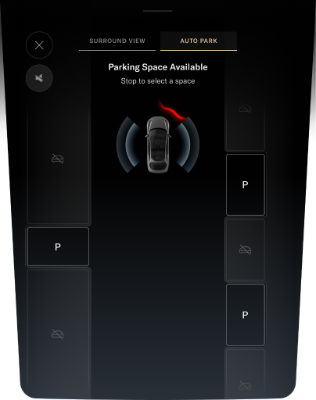
Using Automatic Park In
Press on the Pilot Panel to activate Automatic Park In. The system will then search for parking spaces using the exterior sensors. Drive slowly forward to cause the system to scan the surroundings.
Note: The vehicle must be moving below approximately 15 mph (25 kmph) to scan. The system will prompt you visually and audibly to slow down if it is moving too fast.
Note: You must drive past a space before it can be fully detected.
Detected spaces will be displayed on the Pilot Panel and Glass Cockpit. An audible alert will sound for each one. If you wish to park in a detected space:
Bring the vehicle to a full stop.
Press and hold the brake pedal.
Press a space on the Pilot Panel to select it.
Note: The system can detect up to four parking spaces at a time.
Release the brake pedal and steering wheel to begin parking when the system prompts you. An audible alert will sound when vehicle movement begins. The rear view camera will display on the Right Cockpit Panel during Automatic Park In.
The Pilot Panel will display parking in progress. Monitor your surroundings throughout the parking sequence and be prepared to take control of the vehicle at any time.
Automatic Park In can be stopped at any time by pressing the brake pedal, and will resume automatically when the brake is released.
The system will stop the vehicle and prompt you to brake if it detects an obstacle in the vehicle's trajectory. The RESUME button on the Pilot Panel will become available when the hazard has cleared. Press RESUME and release the brake to continue the parking sequence.
Warning: Automatic Park In does not guarantee braking for an obstacle. The driver is responsible for observing surroundings and braking as needed.
Press CANCEL at any time to stop Automatic Park In. Be prepared to take control of the vehicle. See Automatic Park In.
Note: An audible alert will sound when the vehicle switches gears.
The Pilot Panel will prompt when parking has completed and an audible alert will sound. The vehicle will automatically shift into P when parking has completed.
Note: If the system detects a curb or slope, it will set the wheels, accordingly. To disable this feature, see Automatic Park In.
Canceling Automatic Park In
During the automated parking sequence, Automatic Park In will be immediately canceled if any of the following incidents occur:
System or Sensor Faults
Driver Presses the Accelerator Pedal, Holds the Steering Wheel, or Shifts Gears
Driver Unbuckles the Seat Belt
Driver Presses CANCEL on the Pilot Panel
The Trunk, the Hood, or a Door is Not Closed
The Selected Parking Space is Found to be Too Small after Initial Scan
System Cannot Park Safely After Eight Tries
Road Slope or Grade is Too High
Road is too Slippery or Provides Poor Tire Traction
The vehicle will stop, emit an audible alert, and prompt the driver to take control of the steering wheel and brake pedal when the system is canceled. The vehicle will automatically shift into P (Park) if there is no response from the driver after 30 seconds.
You must start over at the beginning of the process and scan for a space if Automatic Park In cancels for any of the aforementioned reasons and you wish to use the system again.
Automatic Park In Settings
Touch > DreamDrive on the Pilot Panel, then press to enable or disable Auto Park Wheel Curb Assist to configure Blind Spot Display. Settings will save to the current user profile.
Automatic Park Out
Automatic Park Out takes control of shifting, accelerating, braking, and steering the vehicle, positioning it to pull straight out of a parallel parking space.
Note: Automatic Park Out is only used to help exit parallel parking spaces.
Note: Automatic Park Out can only be activated when the vehicle is in P (Park).
Warning: Automatic Park Out
does not consider objects located outside the range of sensors during the pull-out
sequence, including oncoming traffic. Continually check your surroundings throughout
the pull-out sequence, and be prepared to apply the brake and take control to avoid
hazards.
Using Automatic Park Out
To activate Automatic Park Out, press on the Pilot Panel. Press and hold the brake pedal, then tap the direction to pull out. Keep holding the brake pedal while the vehicle scans the available space.
Note: The Automatic Park Out display will vary depending on the DreamDrive package.
Release the brake and steering wheel to begin the pull-out sequence when the system prompts you.
An audible alert will sound when vehicle movement begins. A turn signal will activate in the direction you're turning out.
Note: The driver is still responsible to make sure the turn signal is in the correct direction.
The rear view camera will display on the Right Cockpit Panel during Automatic Park Out.
The Pilot Panel will display Unpark in progress. Monitor your surroundings throughout the
sequence and be prepared to take control of the vehicle at any time.
Automatic Park Out can be stopped at any time by pressing the brake pedal, and will resume automatically when the brake is released.
The system will stop the vehicle and prompt you to brake if a system detects an obstacle in the vehicle's trajectory. The RESUME button on the Pilot Panel will become available when the hazard has cleared. Press RESUME and release the brake to continue the parking sequence.
Press CANCEL at any time
to stop Automatic Park Out. Be prepared to take control of the vehicle. See
Automatic Park Out.
Note: An alert will sound when the vehicle switches drive modes.
When the system has completed the sequence:
The gear will automatically shift into D (Drive).
The system will hold the vehicle in place with the brake.
The Pilot Panel will prompt you visually and audibly to take control of the vehicle.
The gear will automatically shift into P (Park) if there is no response from the driver after 20 seconds.
Note: The Pilot Panel will alert you If Park Out direction is unavailable.
Canceling Automatic Park Out
Automatic Park Out will be immediately canceled during the automated pull-out sequence, if any of the following incidents occur:
System or Sensor Faults
Driver Presses the Accelerator Pedal, Holds the Steering Wheel, or Shifts Gears
Driver Presses CANCEL on the Pilot Panel
Driver Unbuckles the Seat Belt
The Trunk, the Hood, or a Door is not Closed
The Selected Parking Space is Found to be too Small after Initial Scan
System Cannot Park Safely After Eight Attempts
Road Slope or Grade is Too High
Road is too Slippery or Provides Poor Tire Traction
The vehicle will stop, emit an audible alert, and prompt the driver to take control of the steering wheel and brake pedal when the system is canceled. The gear will automatically shift into P (Park) if there is no response from the driver after 20 seconds.
You must start over at the beginning of the process if Automatic Park Out cancels for any of the aforementioned reasons and you wish to use the system again.
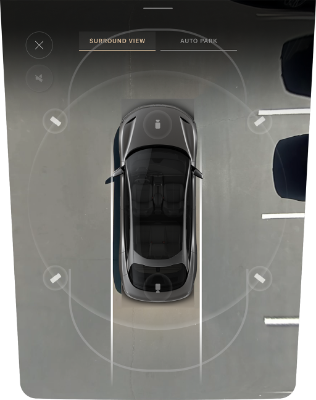
Surround View Monitoring
The Surround View Monitoring system uses the exterior cameras to display the immediate vehicle surroundings in real time. This system will assist you in situations, such as parking or exits with reduced visibility.
Note: Surround View Monitoring is only available when the vehicle’s speed is below 16 mph (27 kmph).
Warning: The Surround View Monitoring system should not be used as a replacement for looking into the interior and exterior mirrors or looking over your shoulder when operating and parking the vehicle. Always inspect your surroundings with your own eyes.
Using Surround View Monitoring
Press on the Pilot Panel to activate the system, then select SURROUND VIEW.
Surround View Monitoring will activate automatically on the Pilot Panel when the gear is in R (Reverse).
Press at any time to close the screen.
Note: Visual indicators for object distance will be displayed when Park Distance Warning is activated. See Park Distance Warning.
Use any of the following screen gestures to manipulate the view:
Use one finger to press and drag, panning the screen to move the camera angle in any direction.
Double tap the screen to zoom and center on the image. Double tap again to zoom out.
Use two fingers to pinch in on the screen to zoom out the camera angle. Reverse the gesture to zoom in.
Use all five fingers to pinch in on the screen and the system will return to the default top-down view.
Press a camera button in the default top-down view to switch to a 3D view from that camera angle.
Press a camera button on the front or rear of the displayed vehicle to switch to the camera view from the front or rear bumper.
Press the button in 3D view to switch to the top-down view.
Surround View Monitoring Limitations
The Surrounding View Monitoring system may not function correctly in the following situations in addition to the limitations of Advanced Driver Assistance components (see DreamDrive Limitations):
The trunk, hood, or a door are not closed.
The side mirrors are folded in.
The trunk or hood is open.
Rear View Monitoring
Rear View Monitoring is an assist feature that will automatically display the rear camera view on
the Right Cockpit Panel when the vehicle shifts into
R (Reverse). See Selecting a Drive
Mode.
Press on the Pilot Panel to manually activate Rear View Monitoring.
Perform any of the following to manipulate the camera view:
Swipe down on the screen to switch to the front camera view or up for the rear camera view.
Pinch outward with two fingers on the screen to zoom in the camera angle. Reverse the gesture to zoom out.
Note: The current magnification level will be displayed to the right of the camera view.
Press the +/- buttons to zoom the view in/out.
Press to close the screen.
Warning: The Rear View
Monitoring system should not be used as a replacement for looking into the interior
and exterior mirrors or looking over your shoulder when operating and parking the
vehicle. Always inspect your surroundings with your own eyes.
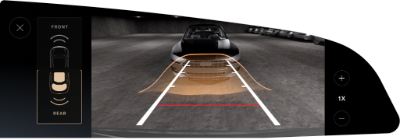
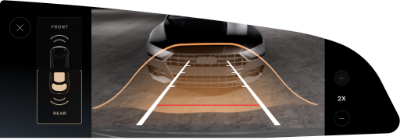
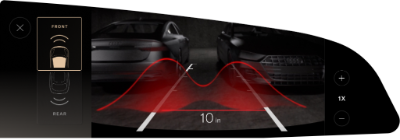
Park Distance Warning
Park Distance Warning uses the exterior sensors to provide you with visual and audible alerts when the vehicle is slowly moving towards a potential hazard.
Note: This feature is only available at speeds below 10 mph (15 kmph).
Note: The Park Distance Warning display will vary depending on the DreamDrive package.
The system will provide visual and audible alerts on these camera views when it is enabled:
The shade of the visual indicator represents how close your vehicle is to an object. Objects that are further away will be indicated by a neutral shade.
The visual indicator will gradually intensify to a darker shade of red as your vehicle approaches an object. If this happens, apply the brakes to slow the vehicle and take any other appropriate corrective action.
Warning: Park Distance Warning is an assist feature only, and will not act to prevent a collision. It is the driver’s responsibility to assess the surroundings and take action when necessary.
Park Distance Warning Settings
Touch > DreamDrive on the Pilot Panel then enable or disable Park Distance Warning to configure Park Distance Warning settings. The settings will save to the current user profile.