The Lucid Navigation App is integrated with your vehicle, providing the best routes based on
your driving style and vehicle. You can use the app from either the Pilot Panel or Clearview
Cockpit, and it can also run in the background when you are on a route.
Key Navigation Features:
Search
Routing
Guidance
Maps
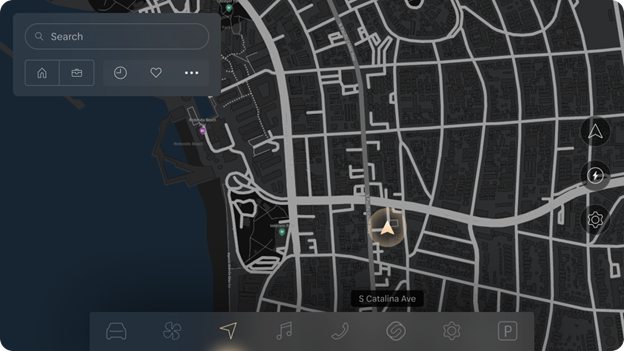
To access the Lucid Navigation App, press the icon on the Right Clearview Cockpit or Pilot Panel. The
screen will display your current location and street name (where applicable).
If you pan away from the current location, the street name will be replaced by a Recenter button.
Touch Recenter to return to the default view showing the current position.
Search
There are multiple ways to search in the Lucid Navigation App. The following search
features can be accessed from the Right Clearview Cockpit or the Pilot Panel:
Use the universal search box to type a
name, address, city name, airport code, zip/postal code, category, or brand name via the
on-screen keyboard.
Select one of the six search
categories. Tap the Charging category icon or the three dots to view additional
categories.
Select from a list of previous
destinations or search terms under Recents. Those places will be
replaced with search matches if you start typing something.
Search in another location by panning
the map and tapping Search This Area to refresh the search
results with matches in the new area.
When routing, you have the following two additional ways to search for a location:
Along the Route:
This narrows the search results to along the route ahead, providing up to 60 results.
For charging searches, it will list results up to 60 miles ahead as sometimes chargers
can be further away.
Near
Destination: The map will zoom in to show the destination and display up to
60 nearby search results in a radial pattern.
Navigation Settings
Press the icon on the Navigation screen via the Pilot
Panel to configure the following navigation options:
Satellite: In equipped vehicles, this toggles preferences for showing
satellite imagery as the background map. When connectivity is poor, the
satellite images might initially look blurry while they fully load.
Note: Satellite imagery cannot load without connectivity or be
downloaded offline. If you lose connectivity, turn off Satellite Maps
and use previously downloaded standard maps. See Map Updates and Offline Mode.
Range Map: Shows the approximate range that can be traveled using
your current level of charge. See Predicting Energy Usage.
Auto-Add Charging: When toggled on, this feature will automatically
add charging stations to the calculated route.
Individual route
preferences will disable when Auto‑Add Charging
is enabled, but any previously set preferences will be
saved.
Note: The Auto‑Add Charging setting is
also available under EV Settings >
Range Support. A change made on one menu will affect
both.
Offline Mode: The app settings have an offline mode if users are
concerned about privacy. In this mode, you will not be connected to a
server, but GPS is still available. Before switching to Offline mode, you
must first download maps while connected via Wi-Fi or cellular connectivity.
While in Offline mode, you can use search (limited to in-map addresses and
businesses), routing (not including traffic), and turn-by-turn
guidance.
Note: If you lose connectivity and are only using downloaded
maps, the number of points of interest for Search will be more limited
and any new route started while in Offline mode will not be an EV Route
(it will not auto-add charge stops, if needed).
At the bottom of the Navigation settings menu, tap Offline
Maps or All Settings or go to
Vehicle Settings > Applications > Navigation to
configure the following additional navigation options:
Map: Toggle preferences for the navigation map appearance, including
Live Traffic, Auto Dark Mode, and Show Pins.
EV Routing: Toggle and set preferences for the navigation system to
consider your vehicle's battery charge level when calculating trips,
including Auto-Add Charging, Minimum Range on Arrival, and Charging
Networks.
Route Preferences: Toggle preferences for which routing types are
prefered and which to avoid.
Guidance: Toggle preferences for how navigation information is
conveyed while routing, including Lane Assistance, Dynamic Zoom, and Voice
Guidance.
Offline Maps: Toggle preferences for downloading and updating maps
and view downloaded maps.
Offline Mode: Toggle the feature on/off.
You can also set volume level, language, and unit of measurement preferences for your
vehicle, including navigation, in Vehicle Settings. See Changing Display Settings.
Charging Category Search
Tap the CHARGING search category icon for the best way to search, sort,
and filter Charging Stations locations. These will include dynamic plug type and
availability information by Stand (not by Plug) wherever possible. The plug type and
availability information require connectivity and are regularly updated directly by
the providers.
You can manually filter options to further sort your options based on criteria such
as availability, distance, power, or plug type.
Additionally, there is a toggle to see nearby trusted brands.
Note: Only public chargers will be
shown.
Note: To reduce the need for scrolling,
incompatible chargers will be automatically filtered out of the Charging Category
search results. To view all compatible and incompatible chargers, user the
Navigation search bar.
Note: The quality of availability
information can vary as it can be affected by connectivity issues as well as
numerous real-time variables at the charging station.
Routing
All Lucid routes are EV Routes by default when connected. These EV Routes are
integrated with your vehicle range and consumption profile. When plotting an EV route, it
will be customized to you and your vehicle in the moment. The Lucid EV Routing
calculation also considers the following factors:
Your vehicle's current state of
charge
Your vehicle's charging and consumption
parameters
Road type and speeds for your selected
route
Current temperature
Current traffic conditions and historical
traffic conditions (for longer routes)
Your current vehicle settings, such as
heating and defrost
The weight of the vehicle, including
passengers and luggage
Vehicle trim
Tire size
The size and age of your battery
The map will display an overview of the proposed route on both the Right Clearview Cockpit
and Pilot Panel once the location is specified. By default, the proposed route is the
fastest route with the least overall travel time (driving and charging time combined) and is
shown on the map in bright blue. Up to two alternative suggestions may be shown in a lighter
blue. All route options will display traffic conditions. If necessary, charge stops will
also be auto-added to all route options.
You can preview and plan your route on the MY ROUTE screen before
tapping GO.
For EV Routes that require charging stops to safely reach the destination, the app will
auto-add DC fast charging stops along with additional details, such as location name, brand
name, address, and suggested charge time.
Note: The system predicts the estimated remaining energy when you arrive at a stop or
destination. The predicted energy estimation is regularly updated in real time as you drive
toward your stop or destination.
After you start driving, alternate navigation routes are continuously displayed on the map
when reasonable alternatives are available. They are easily identifiable by a lighter color
and an info bubble displaying the time difference between them.
Note: Alternate routes are offered solely as reasonable alternatives. The default proposed
route is the fastest route, with the least overall travel time.
To change routes, tap on the info bubble. The alternate routes will automatically update
after a decision point is passed based on new road options and conditions ahead.
The alternate routes provide different options to choose from, allowing you to select the
most suitable one for your needs. When connected, the alternate routes will be shown as EV
Routes with auto-added stops if needed. However, alternate routes still work for non-EV
routes if connectivity is unavailable.
When actively routing, turn-by-turn guidance instructions show on multiple screens once the
route has started. If the navigation on the Right Clearview Cockpit is replaced with media
or the phone app while routing, turn-by-turn instructions will remain in view in the Center
Clearview Cockpit. Lane guidance, exit numbers, highway numbers, street names, distances,
and other guidance details will be displayed when appropriate.
In equipped vehicles, turn-by-turn instructions will display on the Augmented Reality
Head-Up Display (AR HUD). See Head-Up Display for more information.
When the next stop is an auto-added charging stop, additional details will be displayed,
such as the predicted percent of energy on arrival, suggested plug type to use, charge
duration suggestion, and minimum charge percent suggestion. This information will show in
both the DETAILS and EDIT tabs until your route ends. You can tap each auto-added charging
stop on the route from the map view to access more details. When you arrive at an auto-added
charging stop, this information will remain on the screen until you dismiss it, allowing you
enough time to review the recommendation before proceeding.
Note: The Lucid Navigation App calculates predicted energy usage along the route. For more
information, see Predicting Energy Usage
An Insufficient Charge notification will appear if the EV route
requires charging but a fast charger cannot be auto-added along the route. In this case,
Lucid recommends a manual search for charging. Slow chargers can usually be found
and used along the route.
If you deviate from the route at any point, the system will immediately and automatically
recalculate a new route and issue new instructions. If you must stop and turn off the
vehicle while routing, the route will continue to be displayed on the screen when you return
and turn on the vehicle.
Press END or use voice commands, such as cancel
navigation, to end navigation.
Adjusting the Map
The maps on either the Right Clearview Cockpit or the Pilot Panel can be individually
rotated, panned, or zoomed in and out via the touchscreen. The Pilot Panel and Clearview
Cockpit can maintain their own independent map setting and zoom level whether routing or
not.
Pinch or use one finger to double-tap the touchscreen to zoom in on the map. Use two
fingers to tap the touchscreen to zoom out. Swipe two fingers on the touchscreen to access a
3D view of the map.
By default, the map centers around your current location and displays the current street
name.
The RECENTER button will appear any time the map is manipulated
beyond your vehicle's current position. Tap it to return to your current position.
Touch the icon in the lower right of the map to select from one of five default map viewing
modes:
Charging Category Search: Shows
the locations of nearby compatible charging stations. See Charging Category
Search.
3D Track-Up: Shows a 3D view that
tracks your vehicle’s current position and rotates the map to show what is in front of the
vehicle.
2D Track-Up: Shows a 2D view that
tracks your vehicle’s current position and rotates the map to show what is in front of the
vehicle.
North-Up: Shows a 2D view where
North is always at the top of the map.
Route Overview: Shows a 2D view
that displays your current route end-to-end and North is always at the top of the
map.
Note: The Route
Overview mode will only appear when a route is selected.
The default map views will be ignored once you start manually interacting with the map. The
system will maintain your personal user mode until you select one of the default views
listed above.
The map contains features such as real-time traffic, buildings, realistic 3D landmarks in
most city centers (when zoomed in), and points of interest. Points of interest can be
selected from the map to see details and create a route to them. You can also tap on any
other place on the map to view the coordinates and make a route to that point.
Predicting Energy Usage
When compatible vehicles are connected, the Auto‑Add Charging
feature is always ON and helps anticipate the vehicle’s charging needs for a trip.
This feature automatically adds DC charging stations to a calculated route, as needed.
Note: You must manually search and add a charging
stop to your route if no DC charging stations are available. For manually added chargers,
the route ETA calculation will not be able to estimate the required charging
time.
Using Range Map Mode
The Range Map viewing mode, also referred to as Range Spider, provides a visual representation of
anticipated range based on your current battery state of charge, traffic conditions,
elevation changes, and more. To display the Range Map, go to Settings > Range
Spider.
When connected, the Range Map will appear as an irregularly shaped polygon on the map. The
shape of the polygon is based on the road network, types of roads, and all other vehicle and
road conditions that impact the range calculation.
Note: The Range Map automatically refreshes when
the range changes by at least 5% from the previous measurement. Additionally, the Range
Map can be manually refreshed as needed by switching to another viewing mode and then
switching back to the Range Map mode.
Setting Home and Work Destinations
Common destinations, such as your home or workplace, can be stored as shortcuts in the system,
allowing you quick access within the Navigation menus.
If the Home and Work locations are already set in the Search drawer, they can be used as
one-touch shortcuts to start a route. Otherwise, type your address in the Search bar, select
it to view the Details tab, and then tap the heart icon to save it as your Home or
Work location. Home and Work locations can also be set using voice commands and in the
vehicle Profile settings.
To remove a location as Home or Work, select Remove in the
location’s Detail tab.
Map Updates and Offline Mode
The Lucid Navigation App is connected-first, meaning it will first try to get the newest
maps around you over a wireless connection. If connectivity is temporarily unavailable, the
app will fall back on stored offline maps.
Note: When the Lucid Navigation App is in
Offline mode, an icon of a cloud with a line through it will appear on the navigation
screens.
When connected and in use, the navigation app will automatically download maps of your
immediate surroundings even if you have not downloaded maps of the current area. The local
auto-downloaded maps are self-healing and are automatically updated over the air with no
user intervention when they become available and a data connection is present.
Lucid strongly recommends you download your local state or province as a backup
map in case connectivity is ever lost. You can download as many maps as you would like and
can update them as frequently as you want. A message will appear in Navigation
Settings > Download Maps when a map update is available for previously
updated maps. Lucid recommends updating your maps frequently as new roads,
addresses, and points of interest are regularly added and removed.
When offline, the navigation system can only display and search routes based on the local
or downloaded maps. Search results will be labeled as OFFLINE RESULTS
and routes will not be based on traffic or EV considerations.
Note: Offline route calculation cannot be completed if any part of the downloaded map is
missing.