Table of Content

Steering Wheel DreamDrive Controls

Use the left steering wheel touchpad to control DreamDrive.


  1. Cancel Driving Assist Control
  2. Decrease vehicle gap
  3. Increase speed
  4. Set/update speed
  5. Increase vehicle gap
  6. Decrease speed
  7. Activate DreamDrive and switch between DreamDrive modes

Using DreamDrive

  • Press the button to access DreamDrive modes.
  • Press the button to switch between Adaptive Cruise Control and Drive Assist systems (see Adaptive Cruise Control and Drive Assist for more information).
  • Press the button to disengage the feature.
  • Push the up/down button to adjust the set speed by ±1 increment.

    Hold the up/down button to adjust the set speed by ±5 increments.

  • Press left/right button to adjust the gap setting.
  • Press to cancel Drive Assist.

DreamDrive Requirements

Adaptive Cruise Control or Drive Assist can be activated when all of the following conditions are met:

  • Driver’s Seat Belt is Buckled
  • All Doors are Closed
  • Vehicle is in D (Drive)
  • Brake Pedal is Released

Adaptive Cruise Control and Drive Assist will automatically disengage and sound an audible alert in any of the following situations:

  • Brake Pedal is Pressed
  • Driver’s Seat Belt is Unbuckled
  • Liftgate, the Hood, or a Door is Open
  • Gear is Shifted Out of D (Drive)
  • Parking Brake is Applied, (See Parking Brake)
  • Tires Lose Traction
  • Automatic Emergency Braking is Activated, (See Automatic Emergency Braking)
  • System Feature Fails, such as a Powertrain or Sensor Failure
  • Front Camera is Blocked

    Note: Try activating the wipers if the system notes that the front camera is blocked. See Wipers.
  • Brake Temperature is Too High

Adaptive Cruise Control and Drive Assist systems, even under optimal conditions, are not a substitute for safe driving. See DreamDrive Limitations for details.

Adaptive Cruise Control

Adaptive cruise control automatically adjusts your speed to maintain a safe distance from the vehicle ahead of you.

Note: This feature is available only in certain regions/countries with specific trims.
Warning: Adaptive Cruise Control is designed for your driving comfort and convenience and is not a collision warning or avoidance system. It is your responsibility to stay alert, drive safely, and be in control of the vehicle at all times. Never depend on Adaptive Cruise Control to adequately slow down the vehicle. Watch the road in front of you and be prepared to take corrective action at all times. Failure to do so can result in serious injury or death.
Warning: Never depend on Adaptive Cruise Control to brake for pedestrians, animals, or other objects. Always watch the road and be prepared to take corrective action. Failure to do so can result in serious injury or death.
Warning: Do not use Adaptive Cruise Control on city streets or on roads where traffic conditions are constantly changing.
Warning: Adaptive Cruise Control may not detect or brake for narrow vehicles, such as bicycles or motorcycles.
Warning: Adaptive Cruise Control may not detect stationary or slow-moving vehicles below 6 mph (10 km/h).
Warning: Do not use Adaptive Cruise Control on winding roads with sharp curves, on icy or slippery road surfaces, or when weather conditions (e.g., heavy rain, snow, or fog), make it inappropriate to drive at a consistent speed. Adaptive Cruise Control does not adapt driving speed based on road and driving conditions.
Warning: Temporarily turn off Adaptive Cruise Control when driving in areas where you must reduce speed (e.g., turn lanes, entering and exiting highways, or construction zones). This prevents the vehicle from accelerating to the stored speed in such situations.

When engaged, Adaptive Cruise Control uses data from the vehicle’s exterior sensors to automatically adjust your cruising speed, maintaining a safe distance from any vehicles ahead. The default distance maintained is the furthest allowed. See, Adjusting Following Distance.

Adaptive Cruise Control is primarily intended for driving on dry, straight roads with no stops or sharp curves, such as highways and freeways.

Adaptive Cruise Control will issue a takeover request if it cannot safely brake the vehicle.

Note: The Adaptive Cruise Control system will disengage and apply the Emergency Parking Brake (EPB) if your vehicle stops behind another vehicle and remains stationary for more than 10 minutes.

Setting and Changing Cruising Speed

Press the  DreamDrive button on the steering wheel to activate Adaptive Cruise Control. See Steering Wheel DreamDrive Controls.

Note: DreamDrive Mode will default to Adaptive Cruise Control upon first activation. When Adaptive Cruise Control is active, press the  DreamDrive button again to switch to Drive Assist. To turn off Adaptive Cruise Control and only enable Drive Assist go to system settings.

To set the cruising speed:

  • Press the center button to set the current speed or to the posted speed limit.
  • Press the up/down button to adjust the speed by ±1 increment.
  • Hold the up/down button to adjust the set speed by ±5 increments.

Minimum speed: 20 mph (30 kph)

Maximum speed: 120 mph (200 kph)

The cruising speed displays to the right of the speedometer on the Clearview Cockpit and is highlighted when Adaptive Cruise Control is active. Cruising speed can be changed using the same controls once activated.

When switching from Adaptive Cruise Control to Drive assist, the last set cruising speed will resume on the new mode if the driver is at or below the set cruising speed. If the current speed is above the set cruising speed while switching to the new mode then the new mode will set the faster current speed as the new cruising speed.

Cruising Speed

Warning: Occasionally, Adaptive Cruise Control may brake late or unexpectedly due to following a vehicle too closely, or if detection issues occur due to road infrastructure, (e.g., curves, bridges, or tunnels). The driver is responsible for watching the road, controlling the vehicle, and intervening if required, at all times.

Adaptive Cruise Control maintains your selected cruising speed when a vehicle is not detected in front of you.

When cruising behind a detected vehicle, (highlighted in the Center Clearview Cockpit), Adaptive Cruise Control will accelerate and decelerate the vehicle, as needed, to maintain the set following distance up to the set speed. See Adjusting Following Distance.

To toggle between setting the vehicle's current speed or setting it to posted speed limit go into the DreamDrive settings.

The Posted Speed Limit settings:

  • Speed limit offset will allow the vehicle to drive in between the posted speed limit and the desired speed offset.
  • The speed limit offset can be set by fixed miles per hour or percentage of posted speed limit. The offset will range from -20mph (-20km/h) to +20mph (+20km/h) or -25% to +25% the posted speed limit.
  • If Automatic Cruising Speed Update is toggled on it will automatically update from the old posted speed limit to the newly detected posted speed limit.

Resume Speed

When Adaptive Cruise Control deactivates and then activates again, the last set desired speed will resume for the same posted speed limit. If the posted speed limit changes while Adaptive Cruise Control is deactivated then upon activation again the system will default to the speed offset setting of the newly posted speed limit.

Driver Override

You can temporarily override the set speed using the accelerator pedal while Adaptive Cruise Control is active. Adaptive Cruise Control will disengage if it is overridden for more than 60 seconds.

The Center Clearview Cockpit will display the following when you press the accelerator pedal:

  • The lane display will no longer be highlighted, despite usually being highlighted when Adaptive Cruise Control is active.
  • The target vehicle will not be highlighted.
  • The set speed icon will blink.

Once the accelerator is released, Adaptive Cruise Control should automatically resume and return to the cruise speed set by the driver. The Cleariew Cockpit displays the active Adaptive Cruise Control mode.

Warning: Adaptive Cruise Control will not apply the brakes to maintain the set following distance from a vehicle ahead during Driver Override.

Adjusting Following Distance

Warning: It is your responsibility as the driver to determine and maintain a safe following distance at all times. Do not rely on Adaptive Cruise Control to maintain an accurate or appropriate following distance.
Warning: Never depend on Adaptive Cruise Control to adequately slow down the vehicle to avoid a collision. Always watch the road in front of you and be prepared to take corrective action at all times. Failure to do so can result in a collision with the risk of serious injury or death.

There are four time gap settings to select from with setting three being the default time gap. To adjust the vehicle’s time gap settings from the vehicle ahead, press the left/right buttons on the left side of the steering wheel. After the time gap has been adjusted the current time gap will be saved and applied on the next drive session. See Steering Wheel DreamDrive Controls.

The change in the time gap settings is displayed on the Center Clearview Cockpit.

Cancel and Resume Cruise Control

To cancel Adaptive Cruise Control, press the Cancel button on the steering wheel. See Steering Wheel DreamDrive Controls for more information.

Press the brake pedal, if it is safe to do so in the current traffic conditions, to cancel the system.

Extended Stop and Go

The Extended Stop and Go feature adds auto-resume capability to Adaptive Cruise Control (ACC) while in stop-and-go traffic. With this feature enabled, if you come to a complete stop, after the vehicle in front of you begins to move, your vehicle will resume forward movement without additional input from you, provided your vehicle’s Driver Monitoring System (DMS) confirms you are paying attention. If the system fails to detect attentiveness, then driver can always resume by using the accelerator pedal or center button.

Note: This feature depends on DMS being able to confirm your attentiveness, so be sure it has a clear line of sight by adjusting your seating position or the steering wheel position if necessary. See DreamDrive Component Locations.

Drive Assist

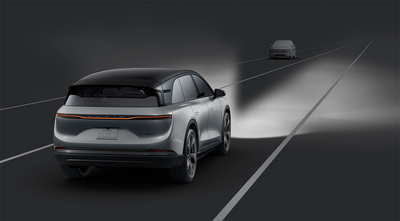
The Drive Assist system detects lane markings to actively steer and center your vehicle in the lane while detecting the presence of other vehicles in your lane in front of you and adjusting your speed to help you maintain a safe following distance.

Note: This feature is available only in certain regions/countries with specific trims.

Drive Assist Overview

Note: Drive Assist is available only with upgraded versions of DreamDrive and in certain regions.

Drive Assist is a feature that detects lane markings to actively steer and center your vehicle in the lane. It detects the presence of other vehicles in your lane and adjusts your speed to help you maintain a safe following distance.

Drive Assist is a DreamDrive feature that requires camera and sensor calibration before first use. The calibration is complete when Drive Assist becomes available to use. For steps on calibrating the vehicle's sensors and cameras, see Sensor and Camera Calibration.

Warning: Drive Assist is designed for your driving comfort and convenience and is not a collision warning or avoidance system. It is your responsibility to stay alert, drive safely, and be in control of the vehicle at all times.
Warning: Never depend on Drive Assist to adequately steer the vehicle. Always keep your hands on the steering wheel, watch the road in front of you, and be prepared to take corrective action. Failure to do so can result in serious injury or death.
Warning: A warning will show if Drive Assist reaches its limits. Always keep your hands on the steering wheel, watch the road in front of you, and be prepared to take corrective action. Failure to do so can result in serious injury or death.
Warning: Detection of lane markings and objects may malfunction, causing Drive Assist to make unexpected steering interventions. If this happens, the driver is responsible for steering the vehicle to conform to traffic conditions.
Warning: Drive Assist may not be available in regions where the vehicle has no network coverage or if the system loses network reception.
CAUTION: Assisted steering may be limited on highways with tight curves, and the system will alert you if assisted steering is limited or unavailable.

Drive Assist is only available on some roads. If you activate Drive Assist and then drive onto a road that Drive Assist does not support, the system will deactivate Drive Assist and activate Adaptive Cruise Control.

Activating Drive Assist

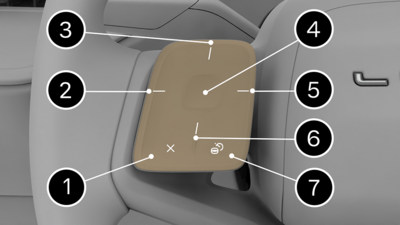
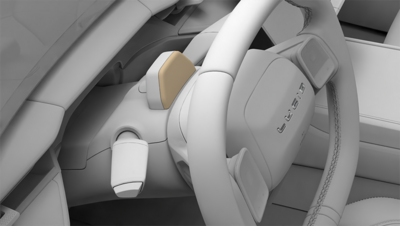
To activate Drive Assist, press the  DreamDrive button on the steering wheel. See DreamDrive Controls. The Drive Assist icon will glow at the top of the Center Clearview Cockpit when activated.

Drive Assist will not drive past the designated Maximum speed: 90 mph (150 kph)

Note: DreamDrive Mode defaults to Adaptive Cruise Control upon first activation. If Adaptive Cruise Control is activated and implemented on a road that supports Drive Assist, press the DreamDrive button to switch to Drive Assist. To turn off Adaptive Cruise Control and only enable Drive Assist go to DreamDrive settings.

You will hear a chime and the lane will be highlighted when Drive Assist is activated.

Note: When Drive Assist has been temporarily overridden the steering wheel icon will blink when overriding with the steering wheel and the set speed icon will blink when overriding with the accelerator.

To toggle between setting the vehicle's current speed or setting it to posted speed limit go into the DreamDrive settings.

Posted Speed Limit settings:

  • Speed limit offset will allow the vehicle to drive in between the posted speed limit and the desired speed offset.
  • The speed limit offset can be set by fixed miles per hour or percentage of posted speed limit. The offset will range from -20 mph (-20 km/h) to +20 mph (+20 km/h) or -25% to +25% the posted speed limit.
  • If Automatic Cruising Speed Update is toggled on it will automatically update from the old posted speed limit to the newly detected posted speed limit.

Resume Speed

When Drive Assist deactivates and then activates again, the last set desired speed will resume for the same posted speed limit. If the posted speed limit changes while Drive Assist is deactivated, upon activation again the system will default to the speed offset setting of the newly posted speed limit.

Traffic Jam Assist

Drive Assist will follow the leading vehicle when the system cannot detect the lane lines or lane markings and there is a vehicle ahead.

Note: Traffic Jam Assist is only available when the vehicle’s speed is under 43 mph (70 km/h). The system will prioritize using the lanes over following a leading vehicle when lanes are detected.
Warning: If there are no lanes detected and Traffic Jam Assist is following a leading vehicle, your vehicle may pursue the vehicle into another lane. Therefore, it is your responsibility to stay aware of your surroundings and be prepared to take corrective action at all times.

Cooperative Lane Change

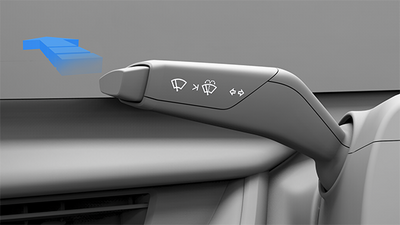
To change lanes without disengaging or deactivating Drive Assist, activate the turn signal in the direction you will be changing lanes. See Turn Signals.

Activating the turn signals and turning the steering wheel will temporarily override the Drive Assist feature. The effort needed to override the lane centering system will be reduced in the direction of the intended lane change, allowing you to manually complete the lane change with ease. Drive Assist will automatically resume when the vehicle is centered in the new lane and both lane lines are detected.

Manual Lane Biasing

Manual Lane Biasing temporarily allows a driver to manually adjust the vehicle's position within a lane while Drive Assist is still engaged and actively controlling the vehicle.

Note: The system will go to an override state if the driver uses excessive steering force to maneuver the vehicle outside a lane, or if the vehicle crosses a lane.

Adaptive Lane Biasing

Adaptive Lane Biasing will add a safe distance on the sides of the vehicle between high-risk vehicles such as trucks and motorcycles. Adaptive Lane Biasing will be turned on by default when Drive Assist is activated, to turn off Adaptive Lane Biasing go to Vehicle Settings then Drive Assist.

Hands-Off Detection and In-Lane Stops

Although Drive Assist helps you with steering, it is necessary to keep your hands on the wheel and pay attention to the road at all times. The system will provide a series of warnings if it detects that the driver is distracted and their hands are no longer on the steering wheel. If the warnings remain unattended to, the system will lead you to an in-lane stop. Please refer to the following information for more information on the warning prompts:

If Drive Assist detects that the driver is distracted, not looking forward and their hands are not on the steering wheel, for longer than 6 seconds, a prompt will display on the Center Clearview Cockpit.

If no steering wheel input has been detected for 15 seconds, a warning will display on the Clearview Cockpit, prompting the driver to place their hands on the steering wheel.

If steering wheel input still has not been detected after an additional 15 seconds:

  • An elevated warning will appear on the Clearview Cockpit, prompting the driver to put their hands on the steering wheel.
  • An alert will sound.
  • The driver will receive haptic brake feedback before in-lane stop deceleration begins.

The final stage of in-lane stop initiation depends on the current speed of the vehicle, and will occur any time after 33 seconds of continuous, nonexistent steering wheel input:

  • The vehicle will gradually slow, depending on the current speed.
  • Hazard lights will activate.
  • A flashing red animation will appear on the Center Clearview Cockpit.
  • Audible warnings will sound.
Note: If the driver provides steering wheel input, or presses either the brake or accelerator during an in-lane stop, the system will cancel the in-lane stop. If the vehicle has already started to slow down, Adaptive Cruise Control and Drive Assist will be unavailable until the next drive cycle.

Once an in-lane stop has completed:

  • The vehicle will automatically shift into P (Park).
  • Drive Assist will get canceled.
  • DreamDrive will be unavailable until the next drive cycle.
  • All doors will unlock.
  • An audible alert will sound.
Note: Warnings will be dismissed if the vehicle is shifted out of P (Park). See Using the Drive Selector for more information.
Warning: An in-lane stop is illegal in many areas. It is only an emergency procedure and should not be misused. Do not deliberately initiate an in-lane stop as a means to stop the vehicle.
Warning: An in-lane stop is meant to reduce the hazard of a moving vehicle that is not being consistently controlled by the driver. However, a vehicle stopped in traffic can also be a hazard.

Steering Override

You can temporarily override Drive Assist while it is active by turning the steering wheel. The Drive Assist indicator will gray out on the Clearview Cockpit when you use the steering wheel.

Once the steering wheel returns to its neutral position, the vehicle has centered in the lane, and the system detects lanes again, Drive Assist will automatically resume and the Clearview Cockpit will return to displaying the active Drive Assist mode.

Manually Canceling Drive Assist

To cancel Drive Assist, press the  Cancel button on the steering wheel.

The system can also be canceled by pressing the brake pedal if it is safe to do so in the current traffic conditions.

Active Curve Speed Control

Curve Speed Control reduces vehicle speed when detecting turns or curves while Drive Assist is active. The system temporarily lowers speed before and during curves.

Note: Do not rely exclusively on Active Curve Speed Control to maintain appropriate speed. The driver is responsible at all times for moderating speed according to conditions.

Lane Change Assist

Note: This feature is available only in certain regions/countries with specific trims.

Lane Change Assist Overview

Lane Change Assist (LCA) allows you to change lanes automatically while continuously monitoring the surrounding traffic conditions.

LCA is a DreamDrive feature that requires camera and sensor calibration before first use. The calibration is complete when a dashed line appears in between the lanes on the center cockpit panel. For information on calibrating the vehicle's sensors and cameras, see Sensor and Camera Calibration.

Note: LCA is an advanced feature of Drive Assist, and works only on freeways and highways when Drive Assist is active.

Activating LCA

Either tap or tap and briefly hold the turn indicator (depending on your chosen option in DreamDrive settings) to activate LCA during Drive Assist.

Note: You can now customize the duration of holding the turn indicator to activate LCA from within the DreamDrive settings. The default is Short Activation.

After LCA is initiated, based on availability, the center cockpit panel displays an empty spot in the adjacent lane to allow you to change lanes.

Warning: Always check the surrounding environment before and during a lane change. The driver is responsible for ensuring that it is safe to perform the lane change, even when LCA is activated. LCA is a driver assistance feature, and the driver remains responsible for the driving task, including ensuring that it is safe to change lanes prior to doing so and monitoring the surrounding traffic throughout the lane change maneuver.
Note: With rear attachments or trailers, this feature will either be unavailable or function with degraded performance.
Note: Your hands should always be on the steering wheel throughout the entire LCA process.
Note: A warning will be displayed on the center cockpit panel if you do not have your hands on the steering wheel after initiating an LCA request, or while a lane change is in progress.

Once the lane change is complete, the turn signal will automatically turn off.

LCA States

LCA availability is indicated on the cockpit panel by dotted lines adjacent to your vehicle, while LCA unavailability is shown by a solid line.

No LCA Available
LCA Ready (Specific to lane)
  1. After initiating LCA, the vehicle will look for an available spot in the adjacent lane.
    • If a vehicle in the target lane prevents the lane change, it will be highlighted in red on the cockpit panel.
      Note: LCA will be canceled after some time while consistently looking for a space to switch lanes when traffic is in the adjacent target lane.
  2. While LCA is in progress, the cockpit panel will show chevrons moving towards the target lane.
  3. After LCA is complete, your vehicle is in the target lane, and lane lines are highlighted on both sides of the lane on the cockpit panel. The turn signals are automatically turned off.

Canceling LCA

You can cancel the lane change by moving the turn signal in the same or opposite direction of the intended lane change after LCA is initiated and before the vehicle has reached the lane marker.

You can cancel a lane change at any point during the lane change by initiating steering override, pressing the brake, or by pressing Cancel or DreamDrive on the steering wheel.

Note: Pressing the brake pedal, Cancel, or DreamDrive on the steering wheel will turn off Drive Assist.
Note: A takeover warning will be displayed if you cancel an in-progress LCA maneuver due to unforeseen circumstances and cannot return to your primary lane.
Note: If conditions are not met after a LCA request is initiated, a warning message indicates that LCA is unavailable. These conditions include but are not limited to the following:
  • The lane boundary is solid.
  • The vehicle is about to leave a freeway.
  • The hazard lights are activated.
  • The vehicle's speed is below 40 mph.
Note: LCA can automatically cancel a lane change and revert to Drive Assist or issue a takeover warning if the lane change cannot be completed.

Traffic Sign Recognition

The Traffic Sign Recognition system uses the front cameras and navigation system data to recognize traffic signs on the road, therefore providing you with driving information, such as speed limits and other regulations.

Note: This feature is available only in certain regions/countries with specific trims.

Traffic signs will display on the Clearview Cockpit next to the speedometer when they are detected.

Warning: Traffic Sign Recognition is only an assist feature. The driver is responsible for paying attention to the road signs and determining the appropriate speed limit, road conditions, and driving speed.
Warning: Traffic Sign Recognition is not available in all countries.
Warning: Map data is not always accurate. The GPS can miscalculate the vehicle location and provide an incorrect traffic sign.
Warning: The Traffic Sign Recognition system will not be fully functional and may provide inaccurate information if a road or traffic sign has recently been changed.
Warning: The Traffic Sign Recognition system will not display correct information and warnings won't take effect if it is unable to determine a traffic sign or is uncertain whether an acquired speed limit is accurate or not.

Speed Limit Alerts

The display color of the speed limit sign will change color and may increase in size when Speed Limit Alert is enabled, (see Speed Limit Alert Settings), and if the current vehicle speed exceeds the detected speed limit. The display of the speed limit sign will return to its normal color and size when the vehicle is slowed down to within the speed limit.

Wrong-Way Warnings

The system will alert you with an audible alert and a notification on the Clearview Cockpit if a Wrong Way road sign is detected and the vehicle passes it.

Speed Limit Alert Settings

To configure Speed Limit Alert settings, use the Pilot Panel and touch >  DreamDrive.

  • Touch to open Safety Features, and then tap to enable or disable Speed Limit Alert. Additional options to receive VISUAL or VISUAL AND AUDIO alerts are available when this feature is enabled.
  • Touch to enable or disable Posted Speed Update Alert. This feature will notify you when a new speed limit is detected and prompts you with an option to update your cruising speed when Adaptive Cruise Control is active. It is the driver's responsibility to determine the appropriate speed limit, road conditions, and driving speed.
    Note: The detected speed limit will still be displayed next to the set cruise speed on the Clearview Cockpit when this feature is disabled.

Traffic Drive-Off Alert

The Traffic Drive-Off Alert provides audible and visual alerts if a stopped vehicle in front pulls away and the interior camera detects that you are not facing forward.

Note: This feature is available only in certain regions/countries with specific trims.

When your vehicle comes to a stop behind traffic, or another stopped vehicle, the Traffic Drive-Off Alert system will monitor the driver and alert them if they are distracted when the front vehicle pulls away from a stopped position.

Note: You will not receive Traffic Drive-Off Alerts if the interior camera detects that you are already facing forward.

When Adaptive Cruise Control is active (see Adaptive Cruise Control), and the vehicle is stopped, you will receive a prompt on the Clearview Cockpit once the traffic ahead clears. You can resume cruising speed by pressing the accelerator or by pushing up on the left steering wheel toggle (see Steering Wheel DreamDrive Controls).

The prompt will change and the system will sound an audible alert if you do not react to the initial prompt within a few seconds and if the driver is distracted.

Warning: Never assume it is safe or legal to proceed when the Traffic Drive-Off Alert activates. Always check your surroundings first.

Traffic Drive-Off Alert Settings

Use the Pilot Panel and touch >  DreamDrive, then press to enable or disable Traffic Drive-Off Alert to configure Traffic Drive-Off Alert settings.

Note: The Traffic Drive-Off Alert setting will be saved to the current active user profile and not reset at each drive cycle.

Distracted Driver Alert

The Distracted Driver Alert System monitors your alertness by detecting your eye movements.

Note: This feature is available only in certain regions/countries with specific trims.

The system monitors you via the interior camera and issue alerts when it detects that your eyes are not on the road.

Distraction is based on eye-gaze and the vehicle will provide alerts when you are:

  • Not looking towards the road for a prolonged period of time
  • Constantly being distracted by multiple short glances off the road
Note: In some circumstances, the interior camera might be blocked. In this case, both the distracted driver and Drowsy Driver Alert will be unavailable. In this case, an alert will appear on the Center Clearview Cockpit. When the obstruction is removed, the driver will be notified.
Note: Alerts are only provided when traveling forward above 11 mph (19 km/h). They are not available when the vehicle is below this speed, or when a turn signal is activated.

If the system detects that your eyes are off the road for three seconds, an alert will display on the Clearview Cockpit and a chime will sound.

If the system detects that your eyes are off the road for an additional three seconds, a warning will display on the Clearview Cockpit and a chime will sound.

Warning: Keep your eyes on the road and avoid blocking the camera when driving. Do not rely on the Distracted Driver Alert to maintain your focus on the road. You are responsible for paying attention to the road at all times while operating the vehicle.

The Driver Awareness Monitoring camera is located on the steering wheel column.

Note: Ensure that the driver's head is in the camera’s field of view. Adjust the steering wheel column if needed.
Note: Distracted Driver Alert works with most types of prescription and polarized glasses. For lenses with low transmittance value, the feature performance might be hindered.

Distracted Driver Alert Settings

To receive the alerts, make sure that Distracted Driver Alert is enabled in Settings on your Pilot Panel.

To activate Distracted Driver Alert on the Pilot Panel, navigate to Settings >  DreamDrive > Safety Features, then enable or disable Distracted Driver Alert.

The Distraction Driver Alert settings will be saved to the current user profile. These settings can be turned off from the Pilot Panel, and will be remembered for the next key cycle.

Note: The sensitivity of Distracted Driver Alert is not user-configurable.

Interior Camera

The interior camera is located on the steering column directly behind the steering wheel.

Drowsy Driver Alert

The Drowsy Driver Alert system issues alerts if it detects early signs of drowsiness.

Note: This feature is available only in certain regions/countries with specific trims.

This system monitors the following signs:

Drowsiness is measured using eye-closure information and driving behavior.

You should keep your eyes on the road at all times, and avoid blocking the camera when driving.

A notification will appear on the Center Clearview Cockpit if the system detects early signs of driver drowsiness.

An indicator will display on the Clearview Cockpit when the Drowsy Driver Alert activates until the vehicle has been stopped or shifted out of D (Drive).

A warning notification will appear on the Clearview Cockpit, and an audible alert will sound if the system detects continued signs of drowsiness after the first alert.

In addition to the alert, the Right Clearview Cockpit will display a list of nearby break areas, when available. Press SHOW ME to view the list or DISMISS to clear. If desired, press a location to add a way point to your current trip and navigate it to that break area. See Navigating.

A new warning notification will appear along with a louder audible alert if the system still detects signs of drowsiness.

Warning: Do not rely on the Drowsy Driver Alert to warn you when you are not focusing on the road or driving erratically. Drive to a safe area and park when you cannot focus on driving.
Note: Drowsy Driver Alert works with most types of prescription and polarized glasses. For lenses with low transmittance value, the feature performance might be hindered.

Drowsy Driver Alert Settings

Click Settings >  DreamDrive > Safety Features on the Pilot Panel, then press to enable or disable Drowsy Driver Alert.

The Drowsy Driver Alert settings will be saved to the current user profile. These settings can be turned off from the Pilot Panel, and will be remembered for the next key cycle.

Note: The sensitivity of Drowsy Driver Alert is not user-configurable.

High Beam Assist

High Beam Assist uses the vehicle's cameras to detect the headlights of approaching vehicles or the taillights of the vehicle directly ahead. Your headlight's will then automatically switch from high beams to low beams. The headlights will return to high beams when the camera sensor no longer detects an approaching vehicle or a vehicle ahead.

Warning: High Beam Assist is an aid for selecting the best possible lighting based on prevailing conditions. The driver is always responsible for manually switching between high and low beam depending on the traffic situation or weather condition.
Note: The feature may automatically switch to low beams when street lighting is detected.
Note: This feature will only operate in dark conditions when the vehicle's speed is greater than 18 mph (30 km/h).

Activating High Beam Assist

  1. Make sure the feature is enabled via the DreamDrive settings.
  2. Put the light settings in Auto Mode.
  3. Push the left steering column lever away from yourself to turn on the high beams.

The High Beam Assist indicator is displayed on the instrument cluster whenever the system is activated.

To override High Beam Assist:
  1. If HBA is in low or high beam and the driver wants a continuous high beam, push the left steering column lever.
  2. If HBA is in high beam and the driver wants a continuous low beam, pull the left steering column lever. Push the left steering column lever to return to HBA after an override.
See High Beam Headlights for more information on continuous high beam or flashing the high beams while HBA is on.

An indicator will display on the Instrument Cluster, and High Beam Assist will be unavailable if the system detects a fault. Headlight high beams can still be operated using the left steering column lever.

High Beam Assist can be enabled or disabled using the Pilot Panel. Select > Vehicle > Drive Settings, then press to enable or disable High Beam Assist.

Reduced High Beam Sensitivity

If High Beam Assist is enabled and the vehicle is parked, tapping and holding the High Beam Assist label in the Pilot Panel for 30 seconds will reveal the Reduced High Beam Sensitivity option.

Note: This option will not appear if the vehicle is not in Park and will disappear automatically if it is in motion.
Warning: Reduced high beam sensitivity may result in the blinding of oncoming traffic. Do not use this mode.

Adaptive Driving Beam

The high beam lights are controlled automatically, and the beam pattern is adapted to the presence of oncoming and preceding vehicles/road users. This is so the driver can have maximum lighting ahead on the road and not have to manually turn the high beams on and off when one or more vehicles enter and exit the driving space where the vehicle’s high beams could adversely affect them.

Note: This feature is available only in certain regions/countries with specific trims.

Enable Adaptive Driving Beam in Vehicle Settings > Driving Settings > Exterior Lighting > Toggle Adaptive Driving Beam then activate it by setting the headlights to AUTO on the Left Cockpit Panel and pushing the left stalk away from you.

Push the left stalk away from you again to deactivate the Adaptive Driving Beam when it is in an activated state.


The gray Adaptive Driving Beam indicator will display on the cockpit whenever the feature is activated but the high beams are off.

The blue Adaptive Driving Beam indicator will display on the cockpit whenever the feature is activated and the high beams are on.

The Adaptive Driving Beam fault indicator will display on the cockpit whenever the feature is activated but the system has a fault causing it to be non-functional. If a failure occurs, the adaptive high beam will turn off and default to low beams. You will still be able to use the manual high beams normally by pushing the left stalk forward.